Standardized Work Plan (SWP) Submission (Grantee/External System) | |
Navigating to the SWP task | |
1 | Click on the Tasks tab from the top navigation bar in the EHBs. |
2 | You will land on the “Pending Tasks - List” page, where you will see a task with a tracking number starting with “SWP####”. This is your SWP submission task. Click on “Start/Edit” under Options to navigate to the Standardized Work Plan – Status Overview Page. |
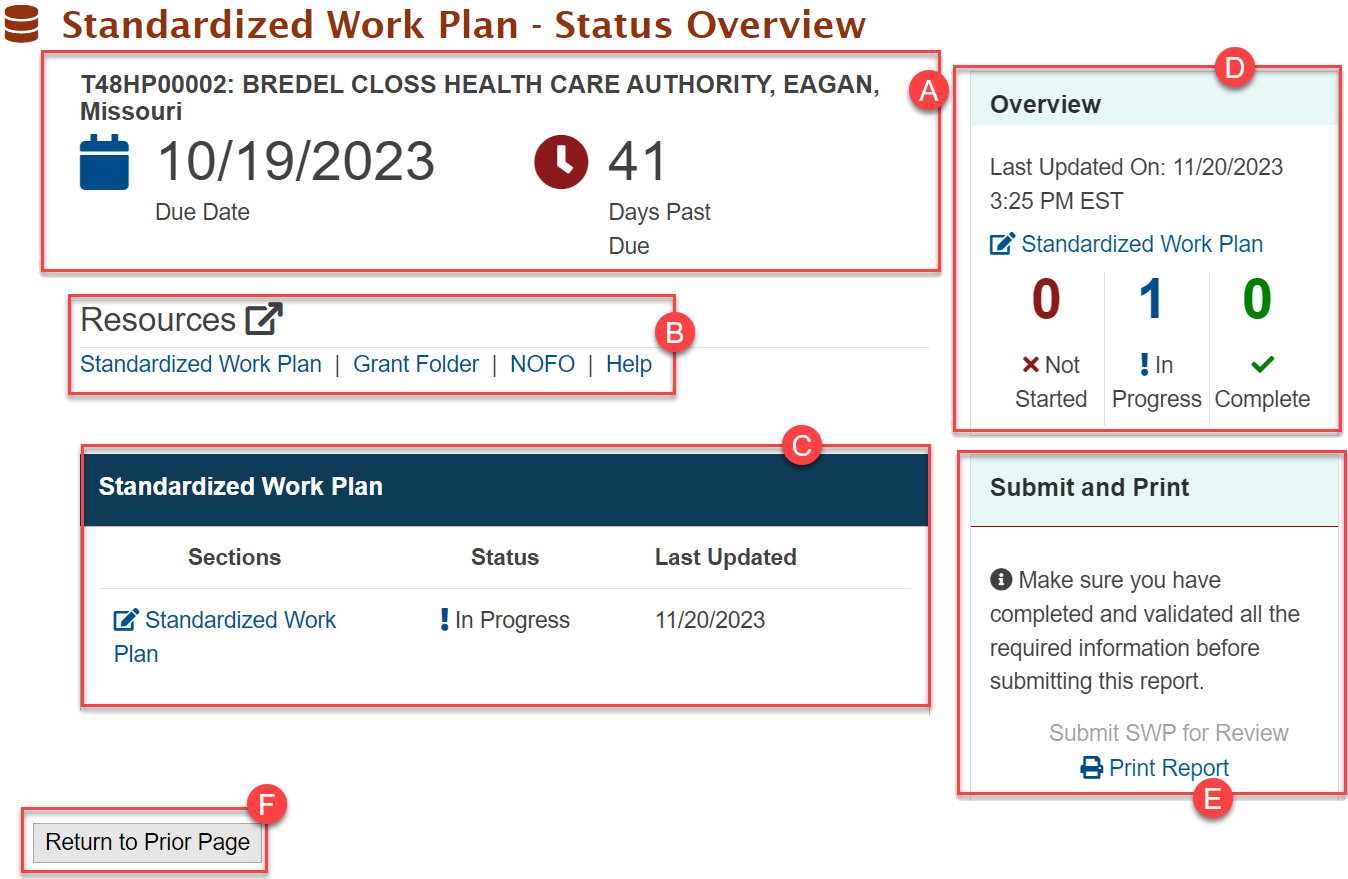
3 | This Page will give you key information about your SWP submission. A. In the Header section you will see your Grant Information, Due Date for the SWP submission and Number of Days left or Days Past Due. Note: The Due Date to submit the SWP is 45 days from the start of the project period. B. From the Resources links you can access the Standardized Work Plan (Read Only), the Grant Folder, the NOFO and Help. Note: The Read Only version of the SWP allows searching for keywords. C. In the Standardized Work Plan section, you can see links to update your Standardized Work Plan, Status of your updates ( X Not Started, ! In Progress or Completed) and Last Updated dates for each links.
D. The Forms Overview section will display the Last Updated On with a date & time stamp, and Status of the update. E. The Submit and Print section will allow you to Submit your SWP for review and to Print to view the SWP. F. Clicking on the Return to Prior Page at any time will navigate you back to the Pending Tasks - List page. |
SWP Submission | |
Updating the SWP Goals | |
4 | Click on the Standardized Work Plan link to go to the Standardized Work Plan – Goals page. |
5 | Clicking on the Standardized Work Plan link will land you on the Standardized Work Plan - Goals page. In this page you will see the following: A. Header section provides Grant and Project Information. B. The Resources section has links to the Standardized Work Plan, Grant Folder, NOFO and Help. C. Budget Period tabs will list out goals planned for each Budget period and display the budget period start and end dates. D. Clicking on Update will allow you to review all Activities, Subobjectives and Objectives under each Goal that were included in the SWP submitted with the application. From here you will be able to make the necessary changes prior to submitting them for review and finalization of the work plan. E. Clicking the “Return to Prior Page” button will navigate you back to the “Standardized Work Plan - Status Overview” page. This can be done via the page button or the Navigational footer available. F. Clicking the “Submit” button will navigate you to the MGATT Submission Confirmation page. This can be done via the page button or the Navigational footer available. The Submit button will be disabled until all budget periods are marked completed. Note that you will have to review and update all the Goals within each Budget Period before being able to submit the SWP for review and finalization. |
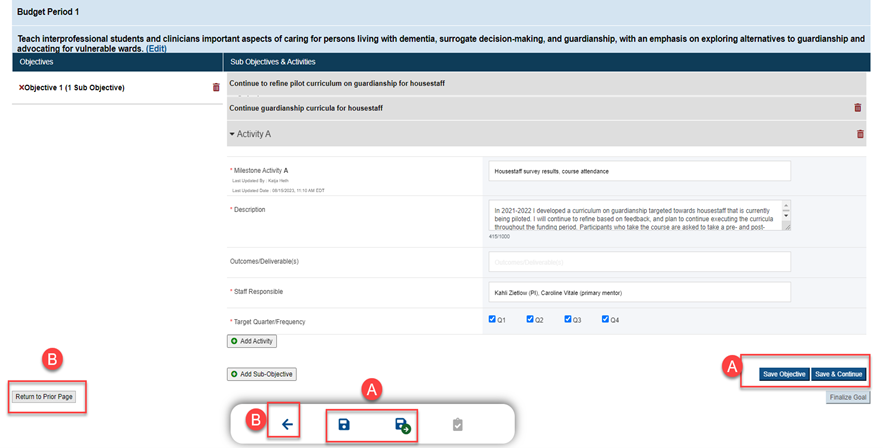
6 | Clicking on “Update” will land you on the Standardized Work Plan - Objectives page. This Page Lists the Goals, Objectives, Sub objectives and Activities within the selected Budget Period as submitted in the application SWP. Under the Goal name, on the left-hand side you can see Objectives listed in tabs. Clicking on each Objective tab will display its own list of Subobjectives and Activities against it. You must review all the Objectives and the Subobjectives and Activities under them. A. Verify that the Goal is populated, and it is correct based on the NOFO program goals. Note: If the MGATT Admin has entered Program Goals and the entered goal does not match what was entered by the MGATT Admin, a warning icon will be displayed. Click on Edit to change the goal name and if a goal from the MGATT Admin is available, it will be displayed as you start typing the goal name B. Verify that the Objective is populated, and it is correct based on the NOFO program objectives. C. Verify that the Subobjective is populated and update as needed. D. Verify that the Organizational Priorities are populated and make updates as needed to ensure it accurately reflects what priority best aligns with the corresponding Sub-Objective. E. Select the BHW Framework that best aligns with the corresponding Sub-Objective. You can hover the cursor over the “More Info” link to get a description of the options available for selection. F. Verify that the Activity Details are correct and make updates as needed. Select the target quarters for each activity. These are the quarters in which you are planning to work on the activity. |
7 | Ensure that all the information under the Objective is reviewed and all the mandatory fields are completed. A. Click on Save Objective (or Save & Continue if there are multiple Objectives left to review) to save it. You can move on to reviewing the next Objective. This can be done via the page buttons or the Navigational footer available. B. Clicking on Return to Prior Page at any time will navigate you to the Standardized Work Plan - Goals page. This can be done via the page button or the Navigational footer available. |
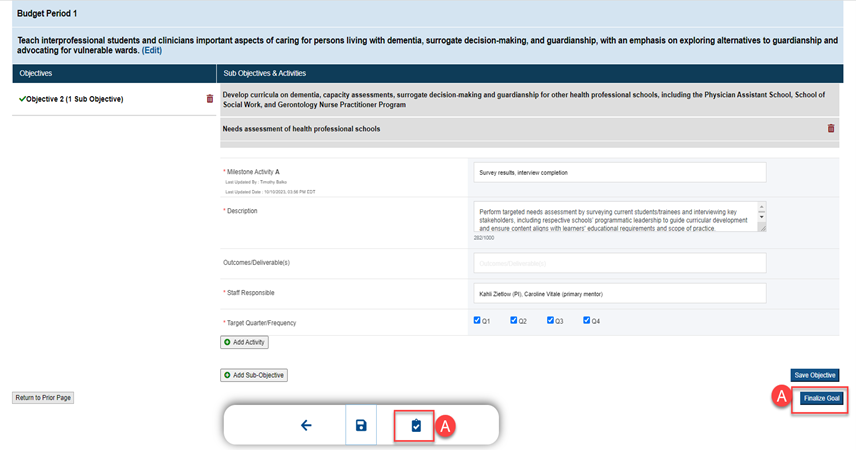
8 | Once all the Objectives under the Goal are reviewed and saved, the Finalized Goal button becomes enabled. A. Click on Finalize Goal to mark the Goal as completed. This will navigate you back to the Goals page and you can move on to reviewing the next Goal within the same Budget Period. |
9 | Clicking on Finalize Goal will land you back in the Standardized Work Plan - Goals page. In this page you will see the following: A. The red X mark (X) on the Budget Period tab indicates that you have “Not Started” Reviewing the Goals. This mark will change to exclamation (!) once you start reviewing and will change to green check mark () once you have completed Reviewing the goal(s) under the budget period. B. The Status of the Goals in this page will be “Not Started” if you have not started reviewing the Goal. It will be “In Progress” if you are in the process of reviewing the Goal. It will be “Completed” if you have saved all the objectives and marked the Goal as finalized. C. The Last Updated Date will display the date the goal and its items were last updated. D. The Last Updated By will show the last person to make changes or review the goal and its items. E. You can Add comments in the Comments section before completing the SWP. You can also delete comments you entered. F. Clicking the “Return to Prior Page” will navigate you back to the “Standardized Work Plan - Status Overview” page. This can be done via the page button or the Navigational footer available. |
Remove Budget Periods | |
10 | To remove a budget period, click the “Delete Budget Period #” link under the last available budget period. This will be useful when the number of budget periods in the award was less than the number of budget periods entered in the SWP during the application. |
11 | The Delete Budget Period confirmation popup will be displayed for the user to confirm or cancel the action. Please note that when the user clicks the Delete Budget Period button from the confirmation popup, all the items from the budget period will be deleted from the SWP. |
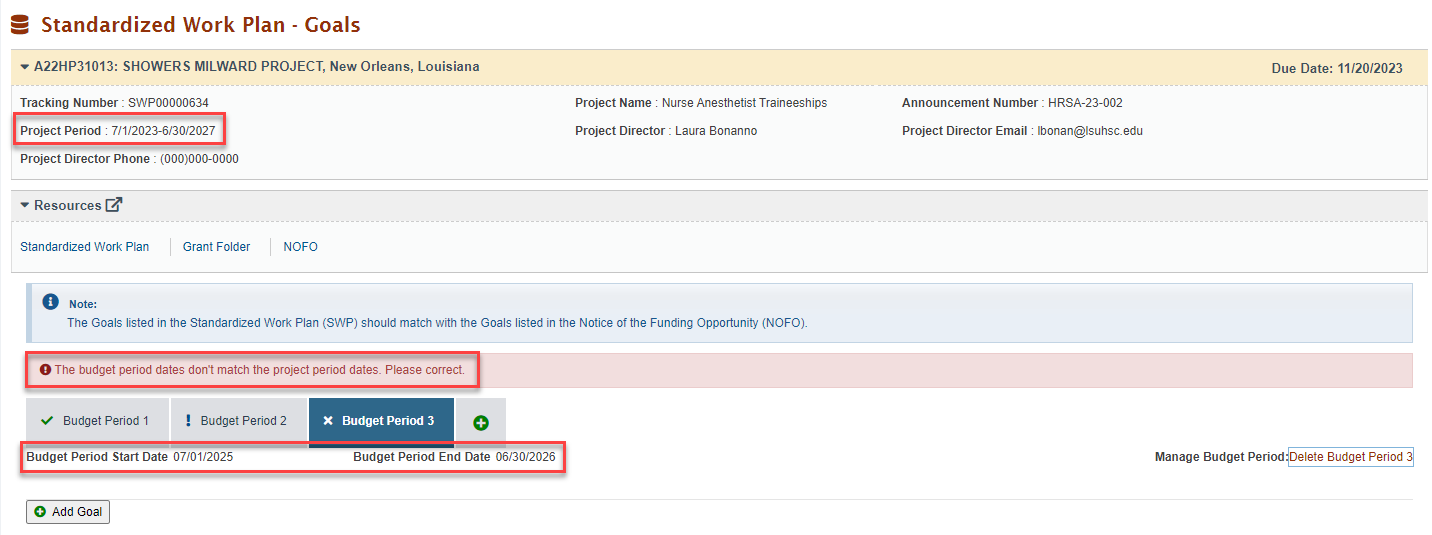
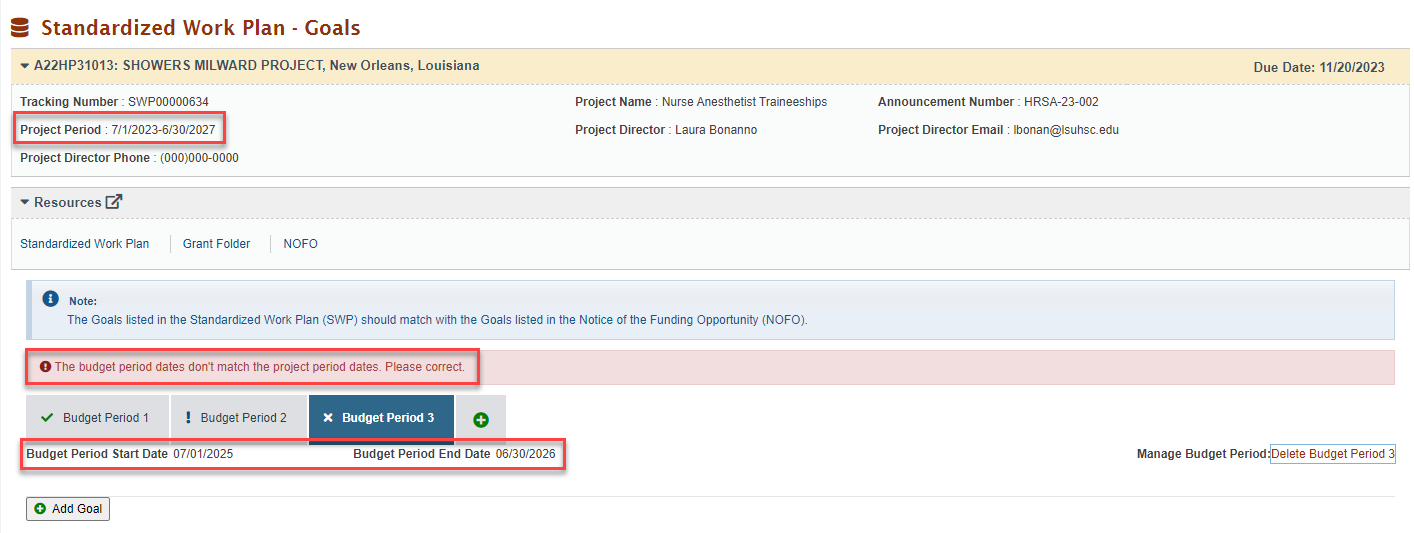
12 | Deleting the budget period may cause the project period dates and budget period dates to not match and a validation will be displayed if this is the case. |
Add Budget Periods | |
13 | When the dates do not match, because either the budget periods entered in the SWP during application are LESS than the awarded project periods, or if a budget period was removed, a validation is displayed. To correct the validation, you must add budget periods to match the project period dates. |
14 | To add a budget period, click the Plus button next to the last available budget period. |
15 | The Add Budget Period confirmation popup will be displayed for the user to confirm or cancel the action.
|
Copy Goals from One Budget Period to Another | |
16 | Instead of having to manually reenter the same goal and its items on each budget period, users can copy a goal from one budget period to another. The user will have the option to copy an entire goal and all its associated items or can choose which items under the goal to copy to another budget period. |
17 | From the Standardized Work Plan-Goals page, expand the context menu for the goal which the user wishes to copy to another budget period. The context menu options will be displayed. Click the Copy to Another Budget Period link in the context menu. |
18 | Clicking on the Copy to Another Budget Period link will land you in the “Standardized Work Plan-Goal Items to move to another Budget Period” page. In this page you will see the following: A. The Select All Items checkbox is selected by default. If only specific Objectives under the goal need to be copied over, deselect this, otherwise keep it selected. B. Starting with the Objectives on the left, select which Objective and its associated items to carry over by selecting the appropriate checkboxes. For any item not needed, do not select the corresponding checkbox. C. If all Subobjectives and activities under the selected objective are to be carried over, keep the Select All selection. Otherwise deselect. D. Select which Subobjectives under the selected Objective to carry over by selecting the corresponding checkbox. E. Select which Activities under the selected Subobjective to carry over by selecting the corresponding checkbox. Please note the following scenarios:
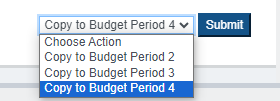
Once the selections are completed, scroll down to the bottom of the page and in the dropdown menu, select the target Budget Period and click the Submit button. |
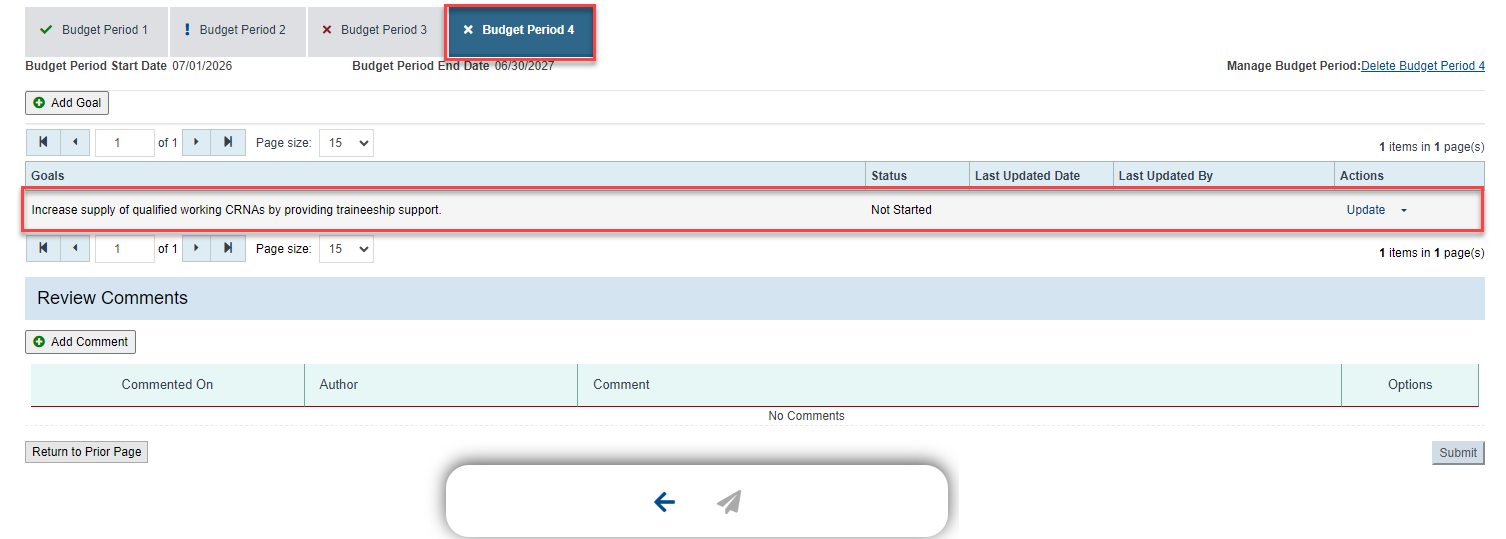
19 | Clicking on the Submit button will land you in the selected target budget period and the goal and goal items selected will be available to make updates and mark completed. |
Edit and Remove Goal Items | |
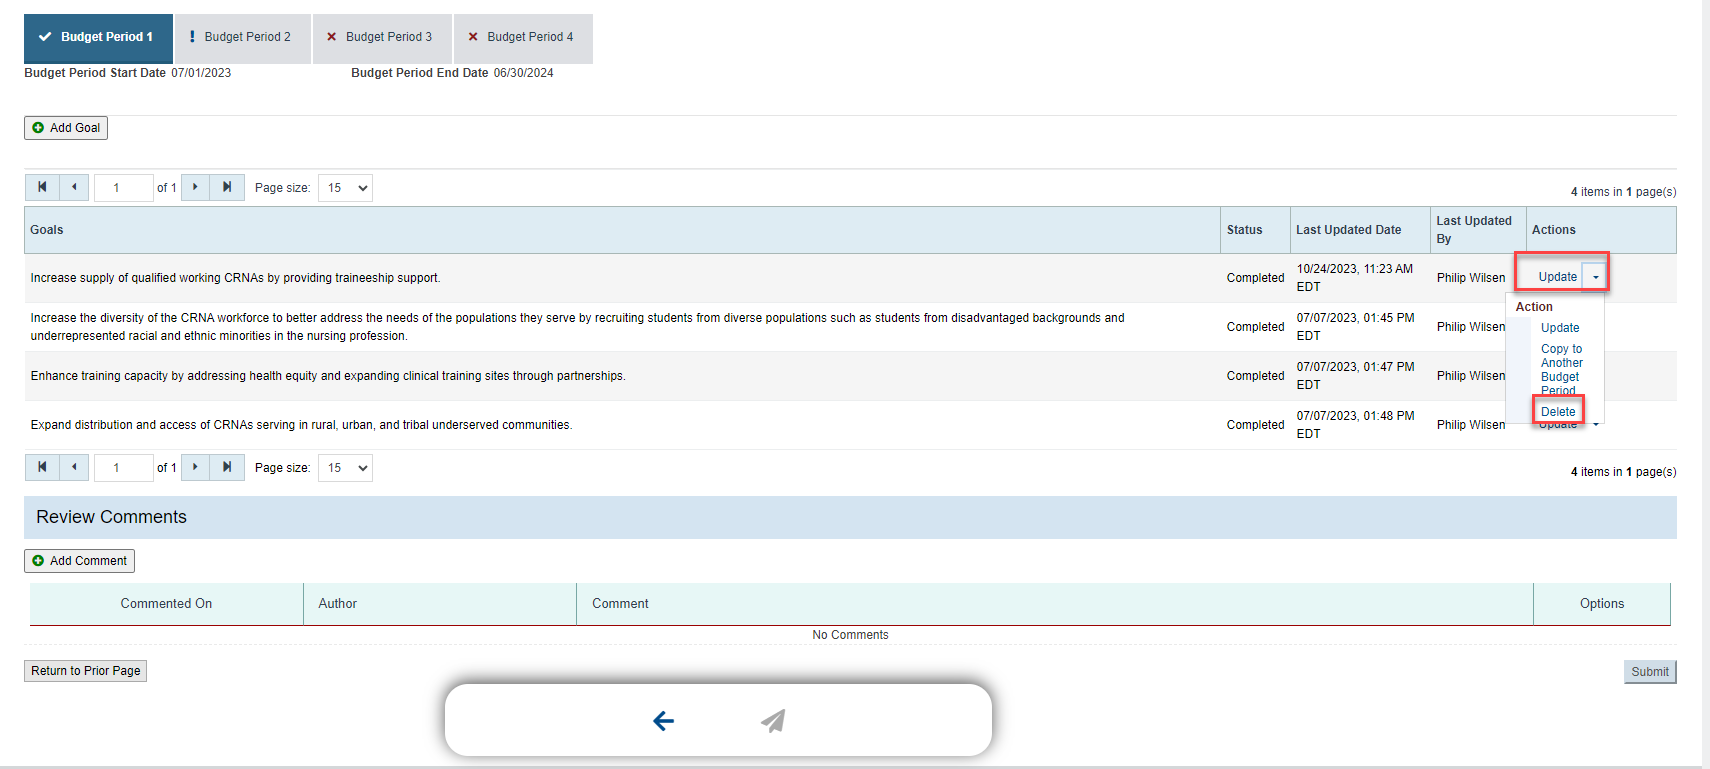
20 | To delete a goal and all its items, from the Standardized Work Plan-Goals page, expand the context menu for the goal which the user wishes to remove. The context menu options will be displayed. Click the Delete link in the context menu. |
21 | The Delete Goal confirmation popup will be displayed for the user to confirm or cancel the action. Please note that when the user clicks the Delete button from the confirmation popup, the goal and all its associated items will be deleted from the SWP. |
22 | To edit a goal and its items, From the Standardized Work Plan-Goals page, expand the context menu for the goal which the user wishes to edit. The context menu options will be displayed. Click the Update link in the context menu. |
23 | Clicking on the Update link will land you in the “Standardized Work Plan - Objectives” page. In this page you will see the following: A. You can edit the name of the goal by clicking the Edit link next to the existing goal name. B. You can delete an Objective by clicking the Delete Icon for the corresponding Objective. Deleting the Objective will remove all its associated Subobjectives and Activities as well. C. If you want to edit the text of the Objective, you can edit it in the Objective name text box. The Objective name is a mandatory field. D. To delete a Subobjective, click the delete icon for the Subobjective you wish to delete. Deleting the Subobjective will remove all its associated Activities as well. E. You can edit the Subobjective name and information by making changes to the Subobjective fields. The Subobjective name, the Organizational Priorities and BHW Framework sections are mandatory fields. F. To delete an Activity, click the delete icon for the Activity you wish to delete. G. You can edit the Activity name and information by making changes to the Milestone Activity fields. The Milestone Activity name, Description, Staff Responsible and Target Quarters sections are mandatory fields. Once the goal is modified, click Save or Save And Continue to save the changes made to the SWP. |
Submitting your SWP | |
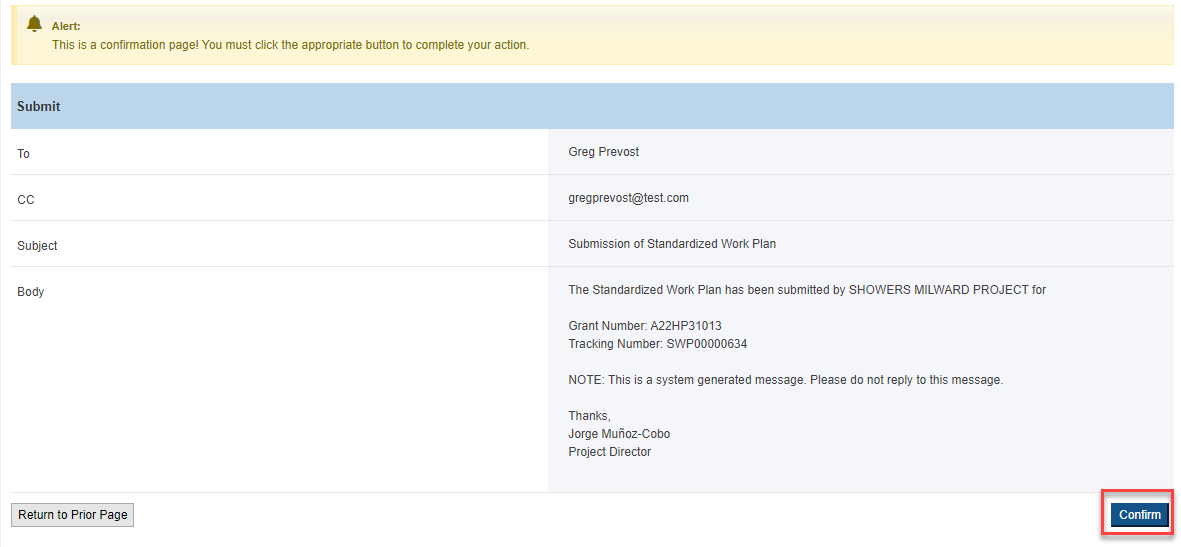
24 | Once all the Budget Period sections are complete, you are now ready to Submit your SWP. The Submit button will become enabled and to complete the SWP Submission process, click on the Submit button. This action can also be taken via the navigational footer. You will be navigated to the SWP Submission Confirmation page. |
25 | Verify that all the information on the Submission Notification is correct and click Confirm to complete the SWP submission. Clicking on Confirm will submit the SWP and send out a notification to the Project Officer. |
26 | This completes the SWP submission process. |
Modifying an SWP After Approval | |
27 | In some cases, a modification to the SWP may be required after it has been reviewed and approved by the Project Officer. The process is as follows:
|
Viewing the SWP Read Only after submission | |
28 | Click on the Grants tab from the top navigation bar in the EHBs. |
29 | You will land on the “My Grant Portfolio - List” page, where you will see your available grants. Click on “Grant Folder” under Options to navigate to the Grant Home Page. |
30 | You will be navigated to the Grant Home Page Click on the “Work on Other Submission” link under Submissions to navigate to the Submissions-All Page. |
31 | This Page will allow you to search for your submitted SWP. To search for an SWP, type the SWP prefix under Submission Tracking Number like and click “Search”. The results will display the submitted SWPs. To view the read only page of the SWP, click the “Submission” link. |
The Read Only version of the submitted SWP will be displayed in a new popup window. To search for items under the SWP, please use the Keyword search. | |


