Accessing PIMS | |
|---|---|
From the EHBs login page, click the Login button. |
|
Enter your Login.gov email and password and click Sign In. Then follow the prompts to complete two-factor authentication. For information about logging into the EHBs and Login.gov, refer to the EHBs Login Process help pages. After completing two-factor authentication you will land on the EHBs Home page. |
|
Locate the Grants Tab on the top navigation bar. Hover over the Grants Tab and click on Work on Performance Report. |
|
You will land on the Submissions-All page. Scroll down to the report list, find your report, and in the Options column click on the Start or Edit button. |
|
This brings you to the Welcome to the Performance Improvement and Measurement (PIMS) pop-up page. Click on the Continue button to access your PIMS performance report. |
|
Form Navigation | |
You will land on the Demographics form, as indicated on the left Navigation bar. A) Use the left Navigation bar to select each form to work on, view reports, validate and submit the report, and view PDFs. B) The center of the page you can view your grant information and status of the report. Helpful Tip! The Review Status in the grant section shows the status of the report as a whole, not the individual forms. C) The remainder of the page contains the form information for you to complete. |
|
| NOTE: The number of forms on the report will vary based on the grant program. |
|
When completing the forms, check the box next to the fields that apply to your organization and enter a number in the box to the right. Note: Once a field is selected the box will turn white and be editable. Grayed out boxes do not need to be filled out. |
|
At the bottom of each form, make sure to view and complete the following: A) Enter any Comments for the reviewer. B) In the 'Is this Form Complete?' section, select Yes or No to indicate if you have completed the form before saving. Select No if you want to make additional edits to the form. C) Select Choose File in the 'File Attachments' to add relevant documents for the form. D) Select the Save button to save changes to the form. |
|
After clicking Save, if there is any missing required information, you will see a Validation Error Message explaining what is missing. Click on the message to go directly to the field that needs attention, or look for the indicator arrow next to the field. |
|
After correcting any validation errors, indicate if the form is complete (Yes) or in progress (No) by selecting the appropriate button. Then click the Save button to save your changes. |
|
You can view the status for each form from the left navigation bar: A) A green check mark indicates the form is completed. If you selected Yes in the 'Is this Form Complete? section you will see the completed status. B) A pencil indicates the form has been saved but not completed. If you selected No in the 'Is this Form Complete? section you will see the edit status. C) A red star indicates the form is required and has not been started yet. |
|
You must complete all forms and see green check marks to submit the report. Reminder: The number of forms will vary based on the grant program. |
|
Click Validate/Submit Report in the Workflow section to submit your report. |
|
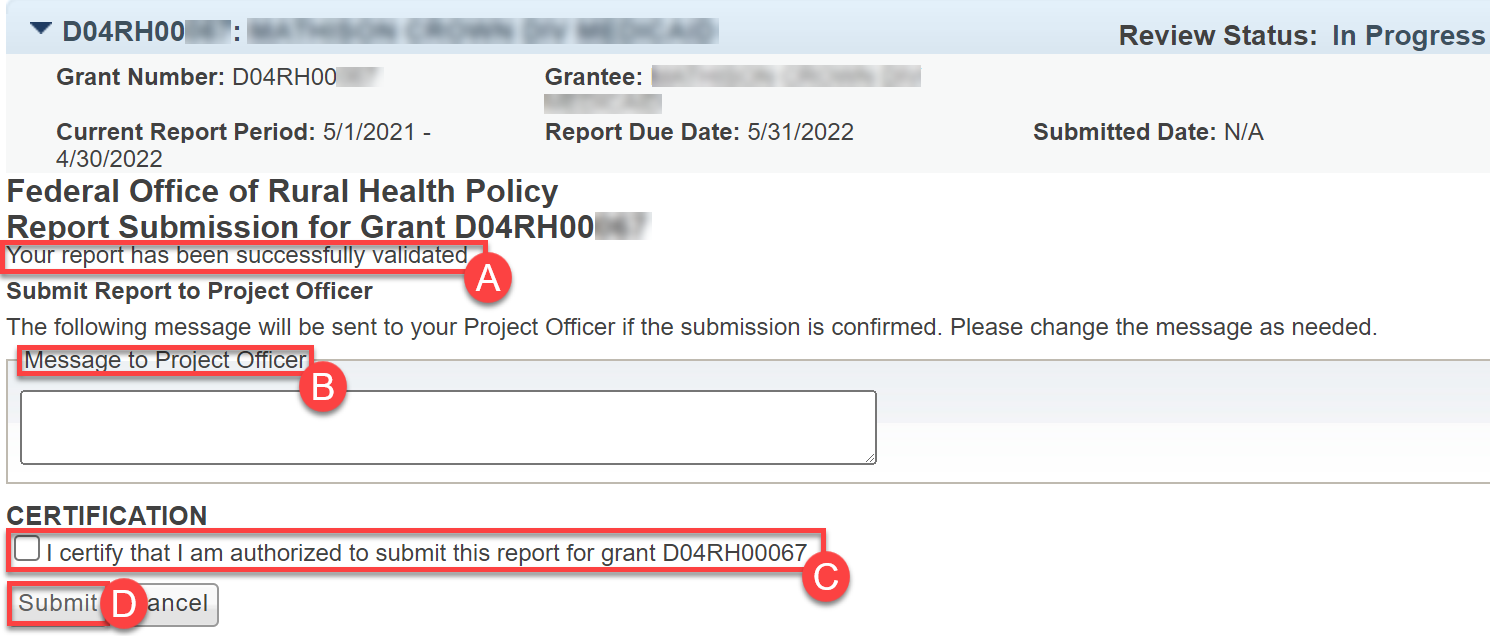
After clicking Validate/Submit Report you will see the following: A) A Submission Validation confirmation message notifying you that the report has been validated and all required fields are complete B) A Message box which you can use to leave a note for the Project Officer that reviews the report C) Be sure to check the box in the Certification section D) Then click the Submit button to submit your report for review |
|
After clicking Submit you will see: A) Review Status as Submitted B) Report Submitted Successfully message C) Confirmation number verifying that your report has successfully been submitted. D) View Report button which allows you to view a read only version of your report |
|
If you click on the View Report button you will land on the Read Only version of the report directly after submission. |
|


Reports | |
|---|---|
| In the Reports section, click on Grantee Raw Data Report. |
|
You will land on the Grantee Raw Data Report. Click on the Export button to view the export options menu. |
|
| Select an export option to export your data. |
|


Accessing PDFs | |
|---|---|
To access previous reports, select the PDF related to the time period it was submitted. This is a read only version of what was submitted. The PDF can be saved and/or printed after opening. |
|
Grantee Info | |
In the Grantee Info section click on Grantee Information to view details about the grant and grantee contacts. |
|
| You will land on the Grantee Information page where you can see a read-only view of the program details. |
|


Change Requests | |
|---|---|
When a Project Officer reviews the performance report they can return the report and request changes. On the Submissions-All page find your Grant and in the Status column you will see Change Requested. |
|
In the Options Column click Edit. This will navigate you the Welcome page where you will click Continue. |
|
This is the PIMS (Performance Improvement and Measurement System) Welcome page. Click the Continue button which will navigate you to the forms section of your report. |
|
You will land in the Grantee Data Entry section of the report on one of the forms pages. A) There will be a Warning Message telling you that the report was returned because there are some issues and what the issues are. Change Requested will show in the following places: B) The Left Navigation Bar will no longer have a green check next to the form that needs to be corrected. It will now have a green arrow pointing to the left. C) The Review Status shows Change Requested indicating there are some items that need to be changed within your form. |
|
After completing requested changes, indicate if the form is complete (Yes) or in progress (No) by selecting the appropriate button. Then click the Save button to save your changes.
|
|
In the left Navigation bar: A) The form will now have a green check next to it showing it has been completed. B) Click Validate/Submit Report in the Workflow section to submit your updated report. |
|
After clicking Validate/Submit Report you will see the following: A) A Submission Validation confirmation message notifying you that the report has been validated and all required fields are complete B) A Message box which you can use to leave a note for the Project Officer that reviews the report C) Be sure to check the box in the Certification section D) Then click the Submit button to submit your report for review |
|
After clicking Submit you will see: A) Review Status as Submitted B) Report Submitted Successfully message C) Confirmation number verifying that your report has successfully been submitted D) View Report button which allows you to view a read only version of your report Your report will then be submitted back to the Project Officer for review. |
|


Overview
Content Tools
ThemeBuilder