Quarterly Progress Update (QPU) Submission | |||
|---|---|---|---|
Navigating to the QPU Task | |||
| 1 | Click on the Tasks tab from the top navigation bar in the EHBs.
| ||
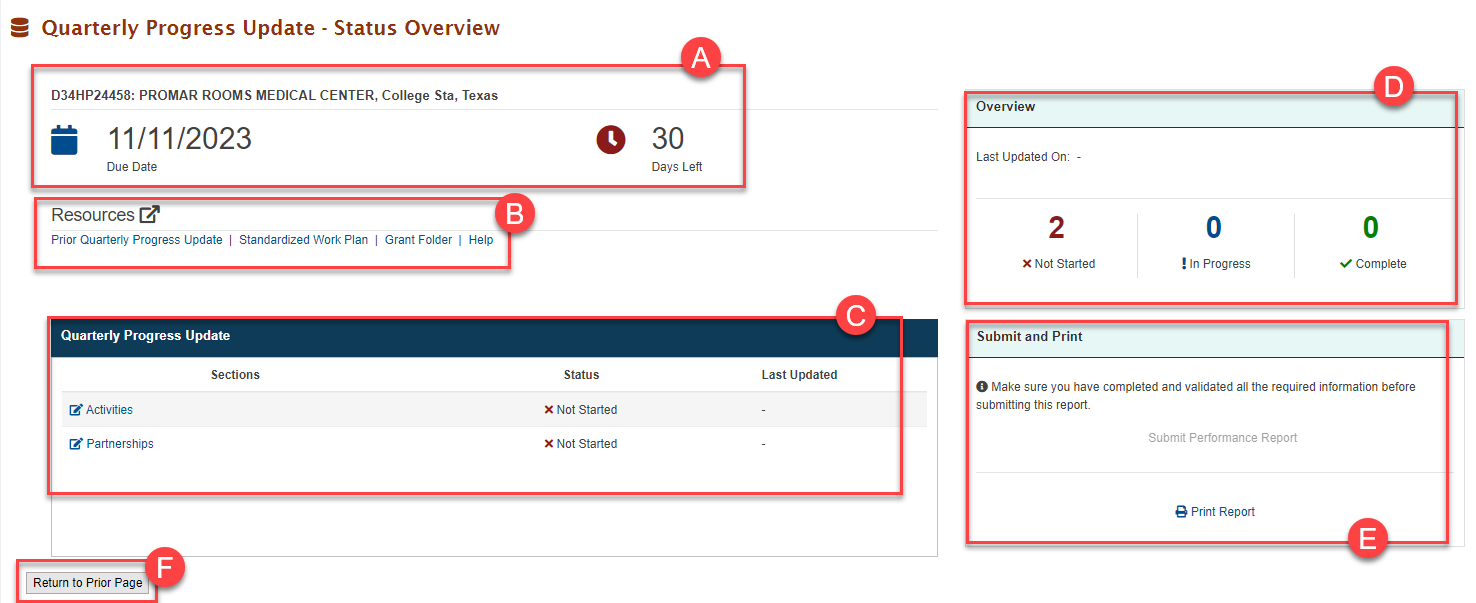
| 2 | You will land on the “Pending Tasks - List” page, where you will see a task with a tracking number starting with “MGT####”. This is your QPU submission task. Click on Start/Edit under Options to navigate to the Quarterly Progress Update – Status Overview Page.  | ||
| 3 | This Page will give you key information about your QPU submission.
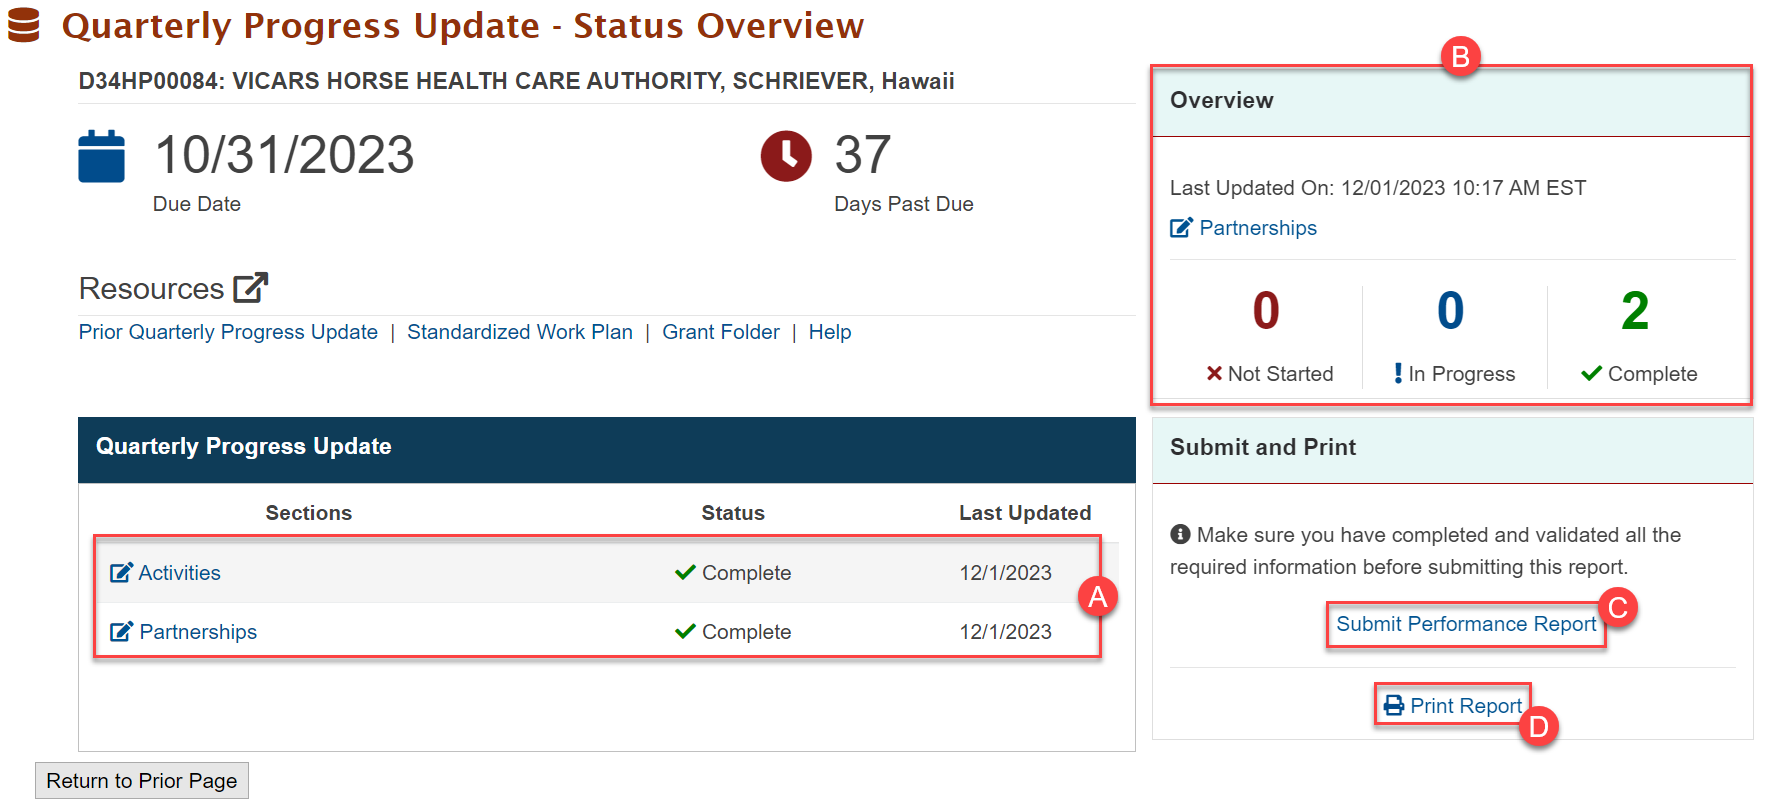
A. In the Header section you will see your Grant Information, Due Date for the QPU submission and Number of Days left or Days Past Due. B. From the Resources links you can access the Prior Quarterly Progress Update (Read Only – if any), the Finalized Standardized Work Plan (Read Only) the Grant Folder, and the Help page. C. In the Quarterly Progress Update section you can see links to update your Activities and Partnerships, Status of your updates ( X Not Started, ! In Progress or
D. The Forms Overview section will display the Last Updated On with a date & time stamp, and Status of the update. E. The Submit and Print section will allow you to Submit your Performance Report (QPU) and to Print the QPU as submitted. F. Clicking on the Return to Prior Page at any time will navigate you back to the Pending Tasks - List page. | ||
Updating Activity Progress Status | |||
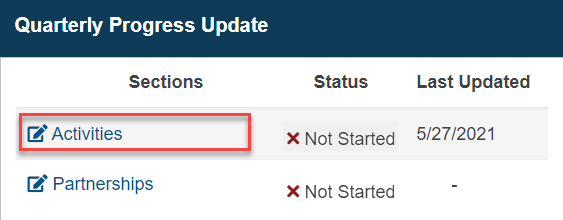
| 4 | Click on the Activities link to go to the Quarterly Progress Update – Activities page.
| ||
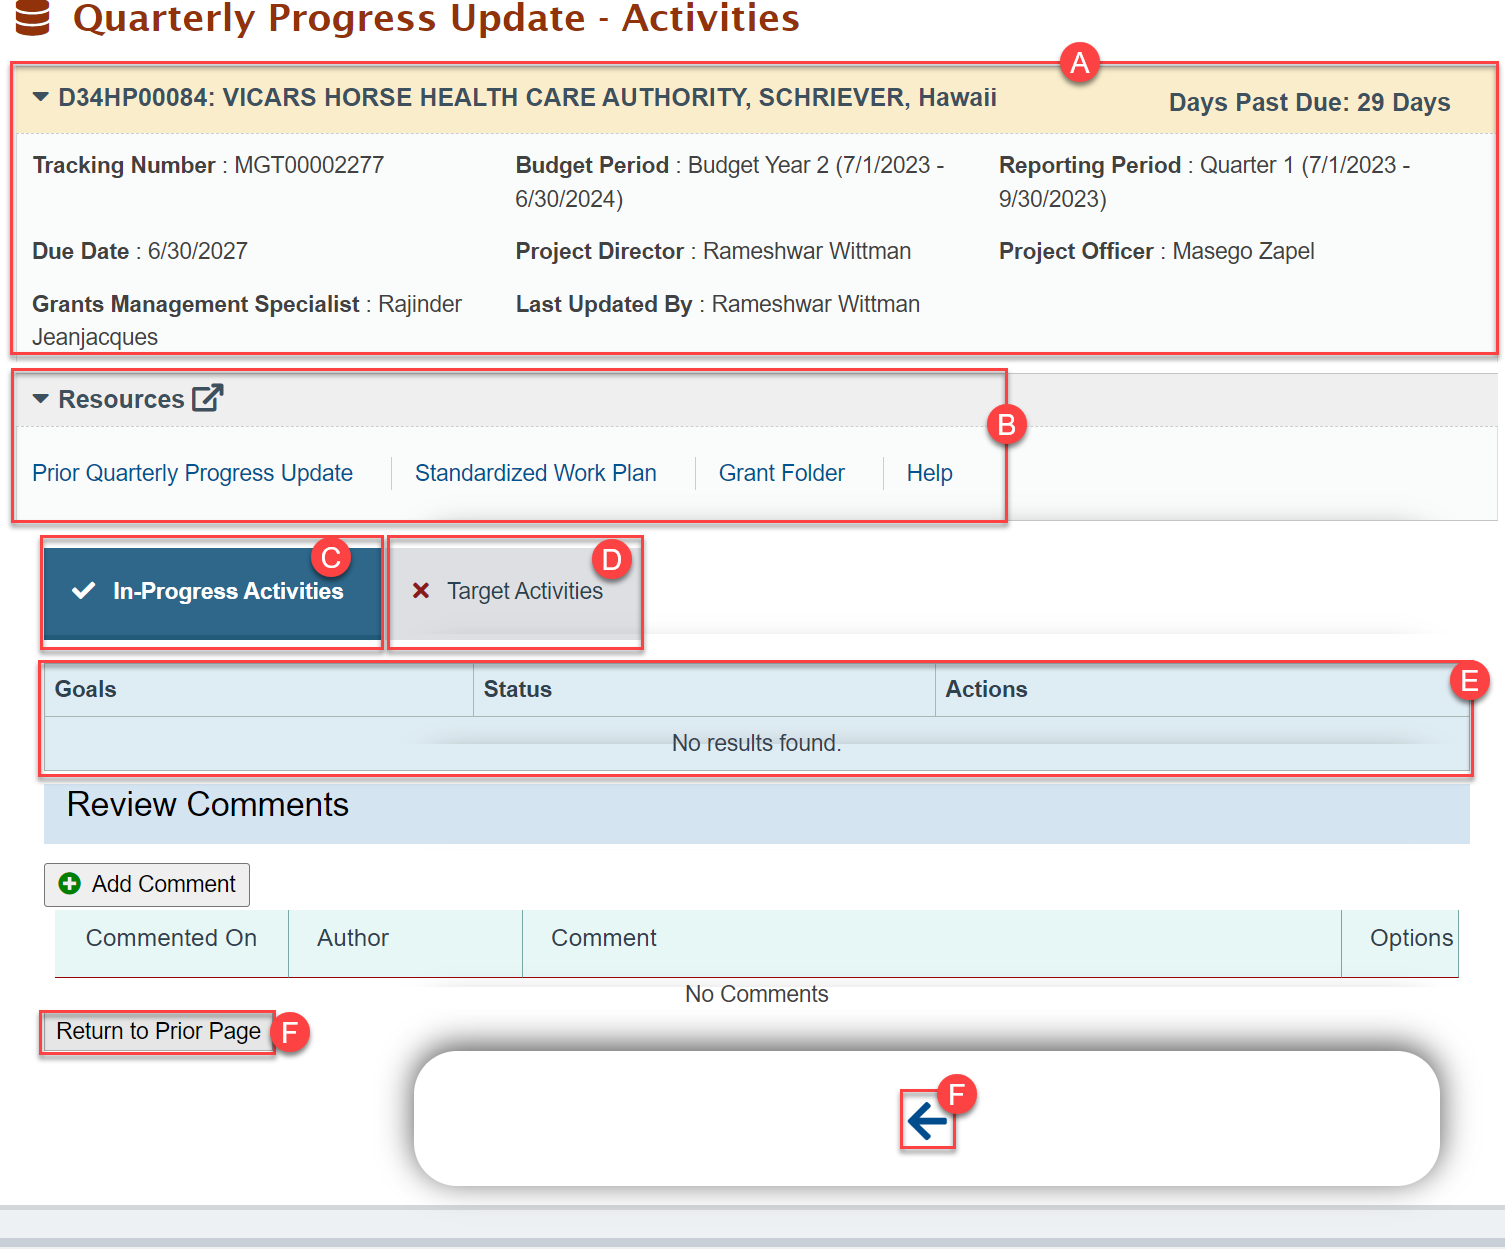
| 5 | The Quarterly Progress Update – Activities page displays the Goals planned out for the Quarter/Reporting Period as per the Standardized Work Plan (SWP).
A. The Header section provides Grant and Project Information. B. The Resources section has links to any Prior Quarterly Progress Updates (Read Only if any), the finalized Standardized Work Plan, the Grant Folder, and Help materials. C. The In-Progress Activities tab lists all Goals/Activities that have been marked as “Timing is off track”, “Activity will be missed” or “Activity cannot be achieved” in the previous reporting period. Therefore, the In-Progress tab will not list any Goals/Activities in the first Reporting Period. You must update the activity progress of all Goals (if any) in this tab. D. The Target Activities tab lists all Goals/Activities that were marked as “Activity is on Schedule” in the previous reporting period and all the other Activities planned for the Quarter/Reporting Period as per the SWP. You must update the activity progress of all Goals in this tab. E. The Goals section lists Goals/Activities based on the tab selection above. Status for each Goal will be “Not Started” if you have not started updating the status of Activities in them, “In Progress” if you are in the process of updating them, or “Completed” if you have completed updating the status. The Update link under Actions will allow you to navigate to the next page to update the Status of the Activities under each Goal. F. Clicking on the Return to Prior Page at any time will navigate you back to the QPU – Status Overview page. This can be done via the page button or the Navigational footer available. | ||
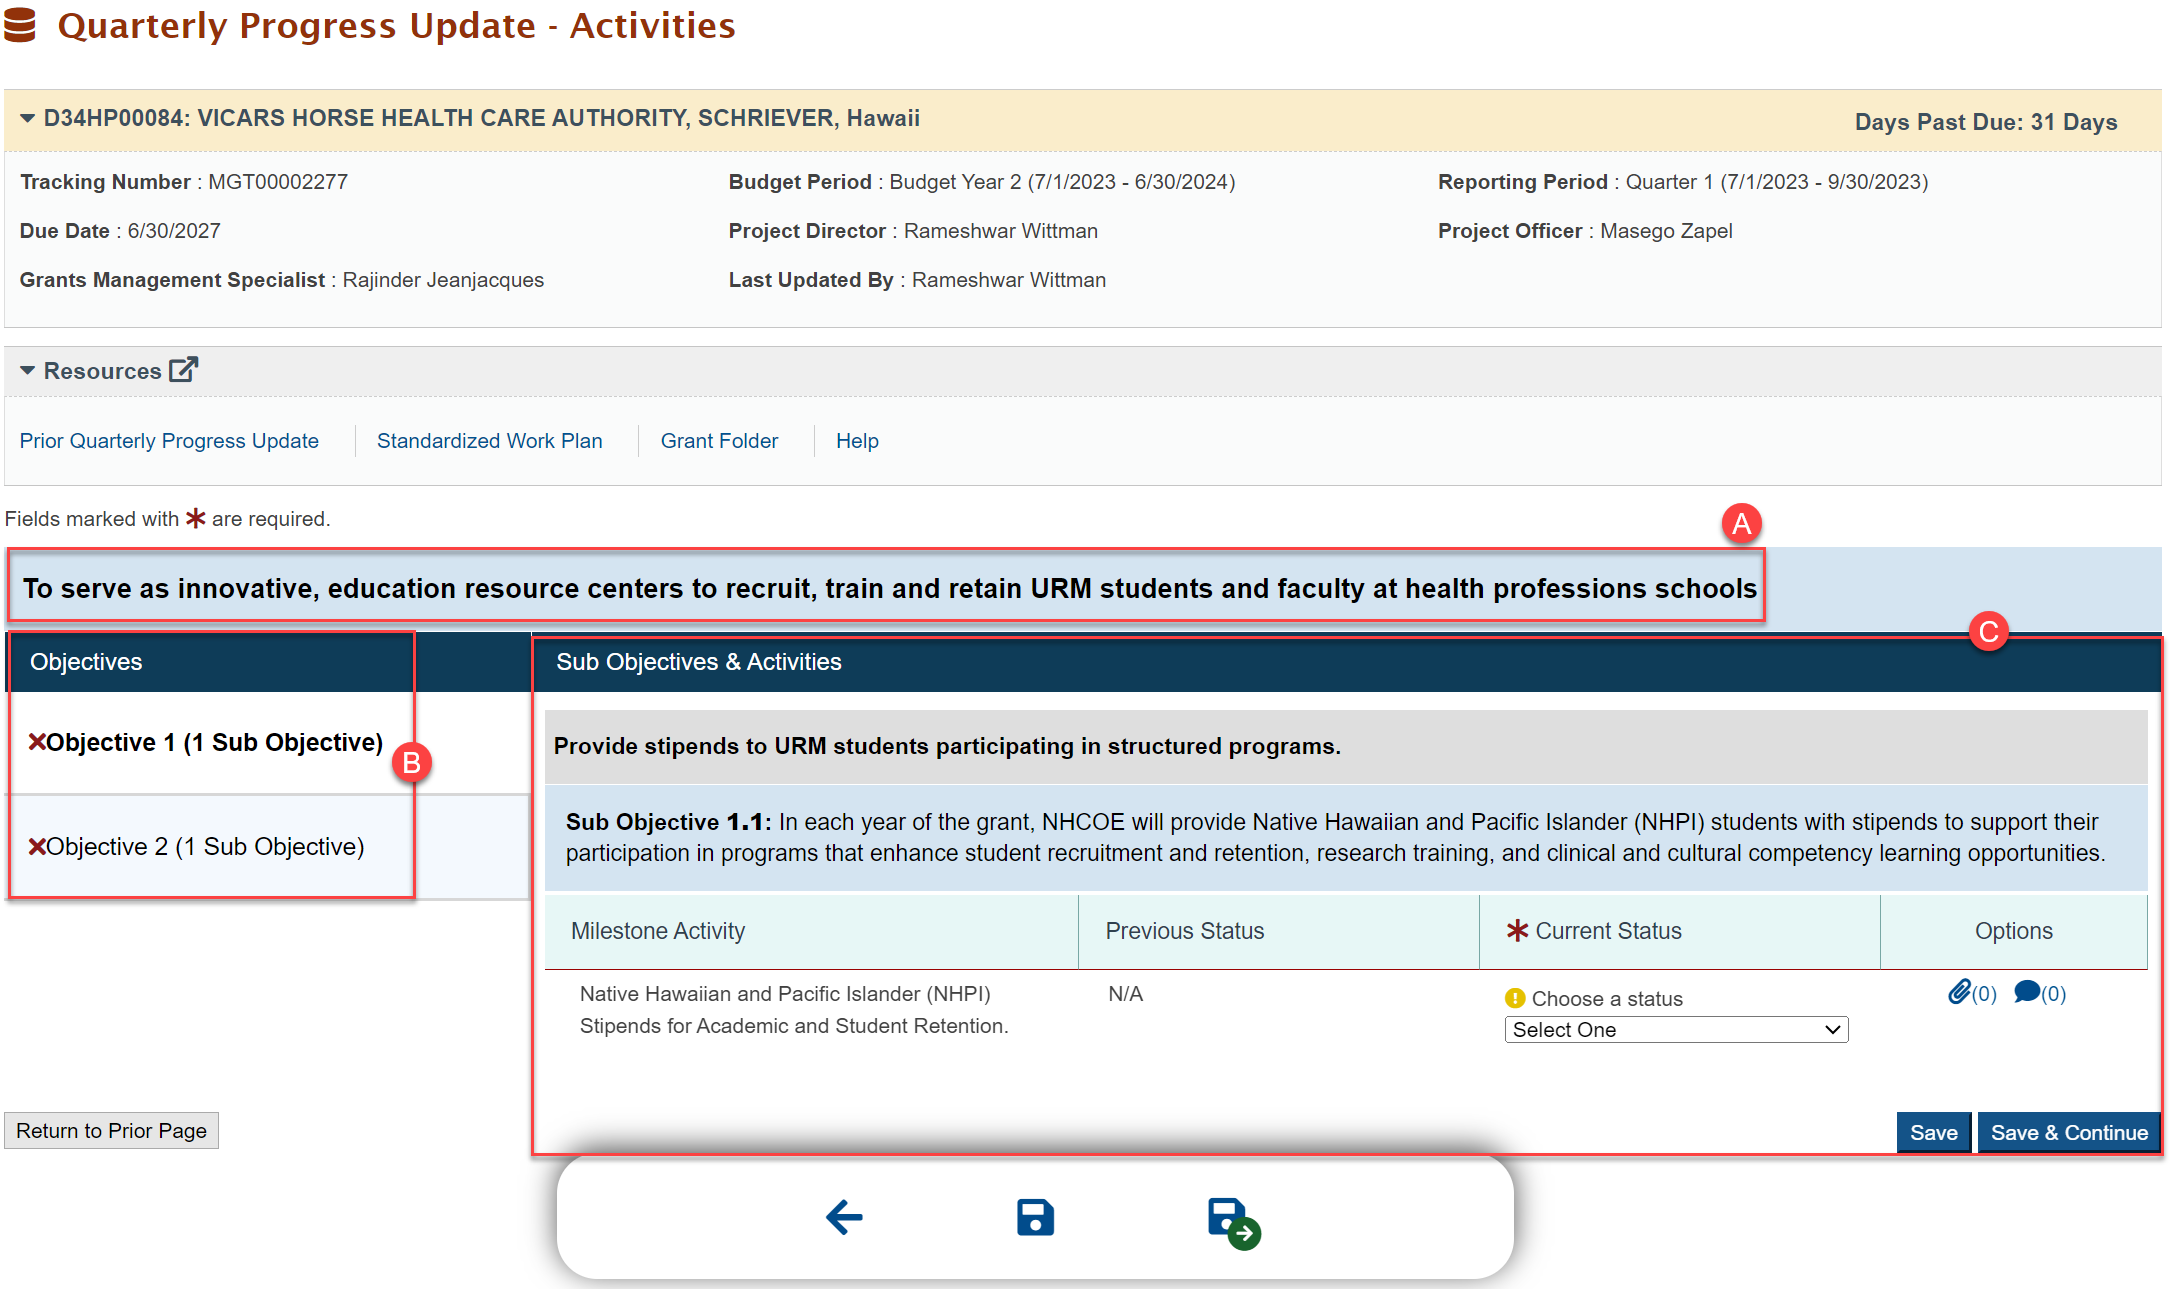
| 6 | Click on the Update link in the Goals section. The system will navigate you to the Quarterly Progress Update – Activities Page where you can update the progress status of the Activities for the Reporting Period. You will see that the Header and the Resources section is same as in the previous page. Under these sections you will see the following: A. The selected Goal. B. The list of Objectives under the selected Goal in different tabs. Clicking on each Objective tab will display the Sub Objectives and Activities against it. C. The Sub Objectives and Activities of the selected Objective. | ||
| 7 | You can now start updating the progress status against the activities for the Reporting Period. 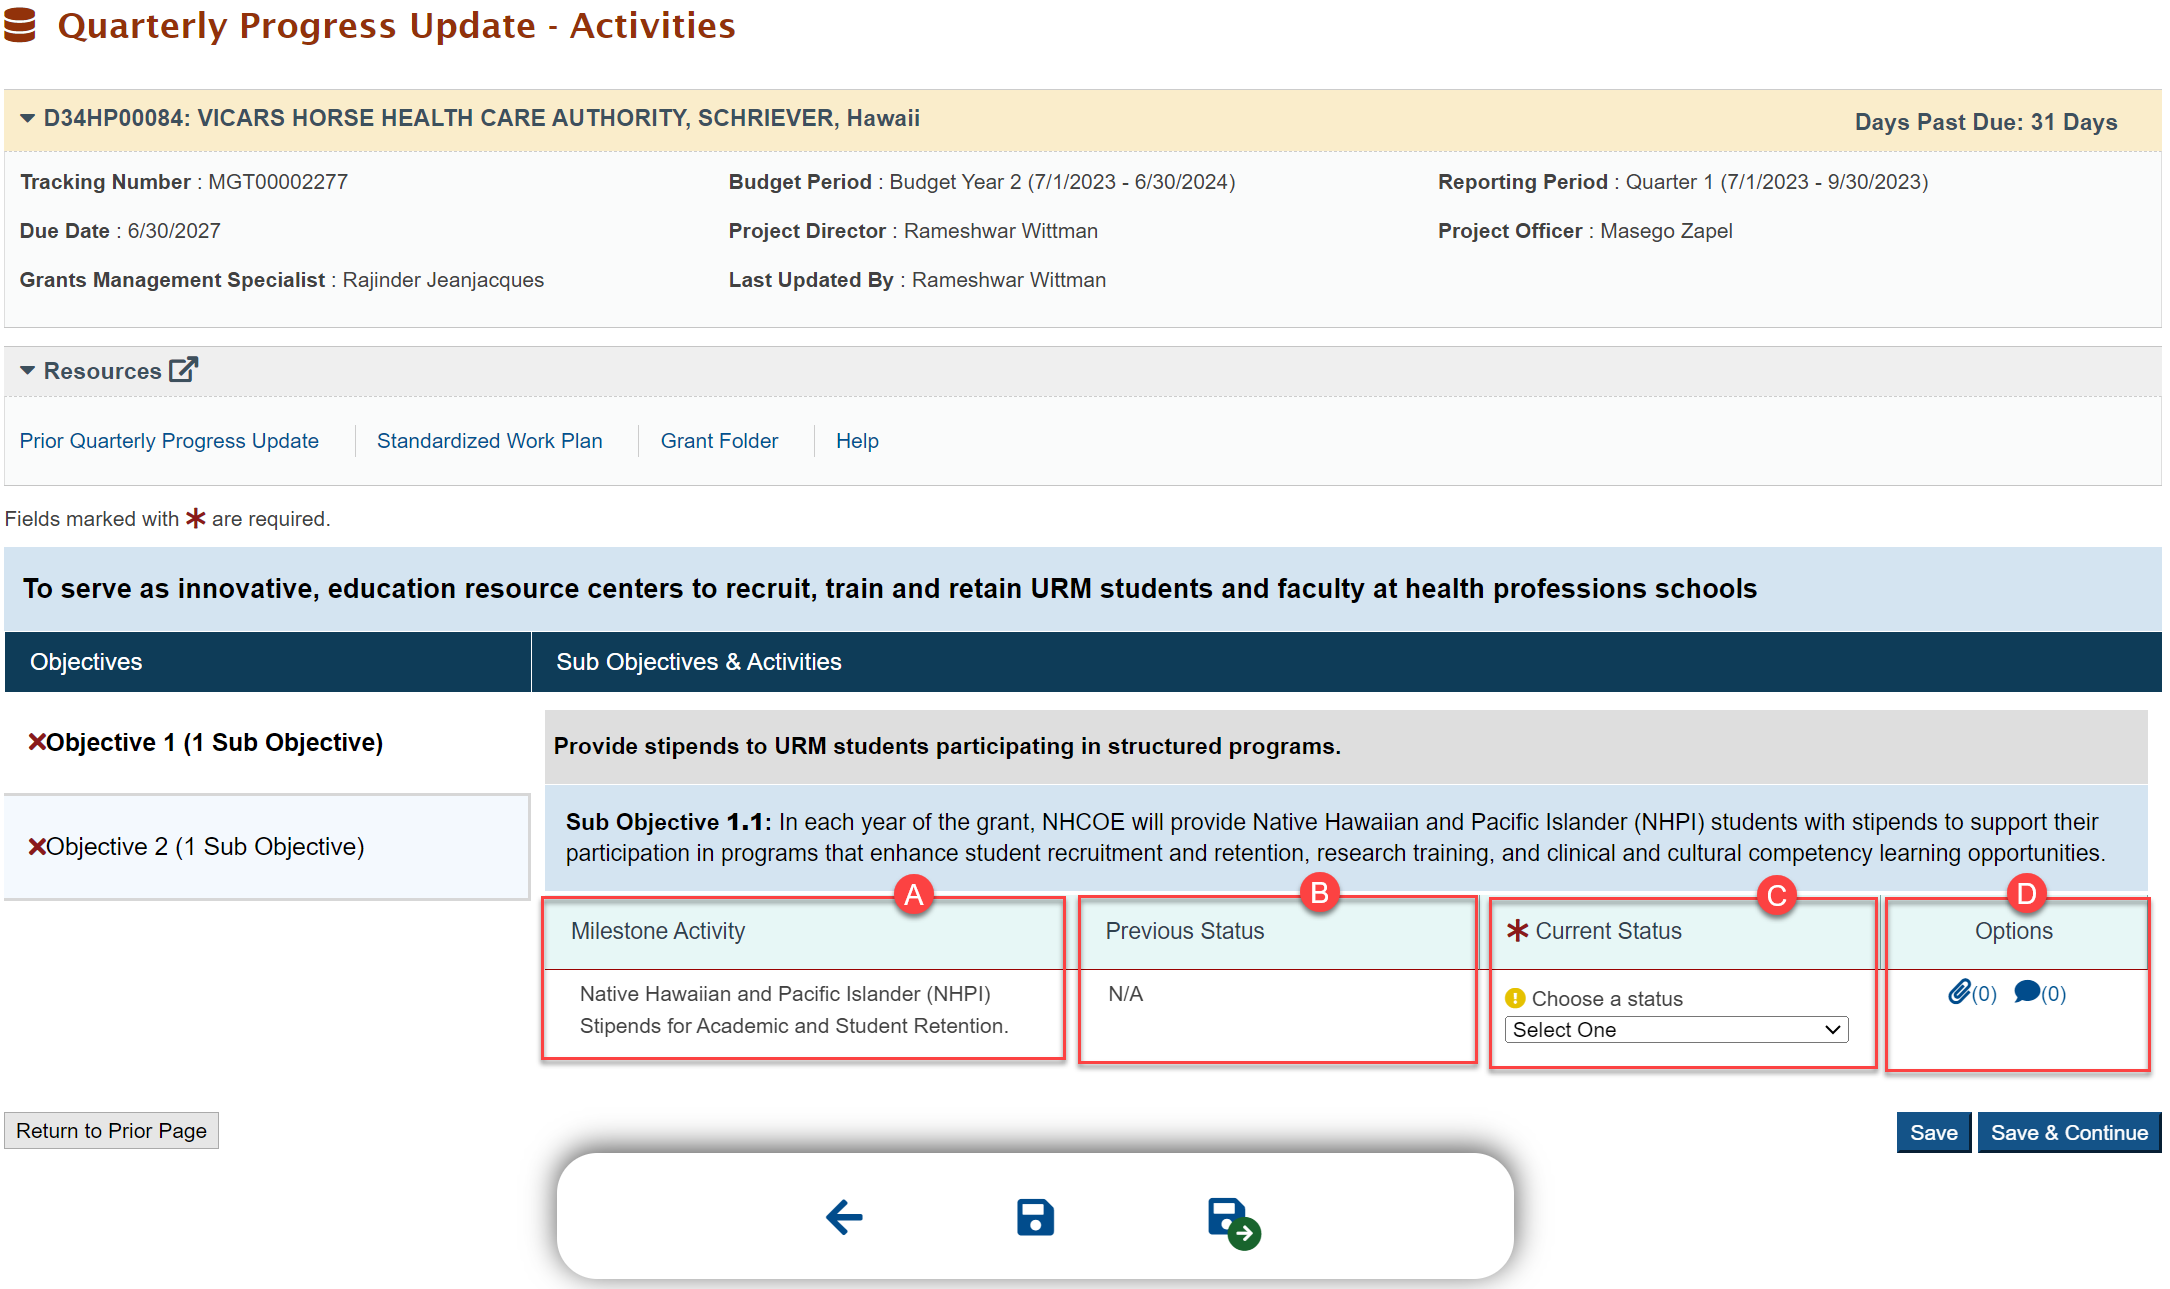 Against the selected Objective you will see the Sub Objectives, and under each Sub Objective you will see the Activity details such as: A. Milestone Activity or Activity name. B. Previous Status is the progress status as updated by you in the previous quarter for the activity. Note: This will show as N/A for all activities in the first quarter/reporting period. C. Current Status is where you will update the progress status of the activity for the current quarter/reporting period. Click on the dropdown arrow to see the available options for selection. The options available for selection are as shown in the image below. Make a selection from the dropdown that represents the progress status of the activity. Note: This is a required filed and you will see an error if a value is not selected in this field. D. Under Options you can attach any Deliverable/Accomplishment associated to the activity and add any comments if needed. This step is explained further below. | ||
Adding Deliverables/Accomplishments | |||
| 8 | You can Upload attachments to any Deliverables/Accomplishments associated to the Activity if needed. Click on the Attachment icon under Options.
| ||
| 9 | This will navigate you to the Deliverables/Accomplishments – Upload Page. Click on the Add Deliverables button.
| ||
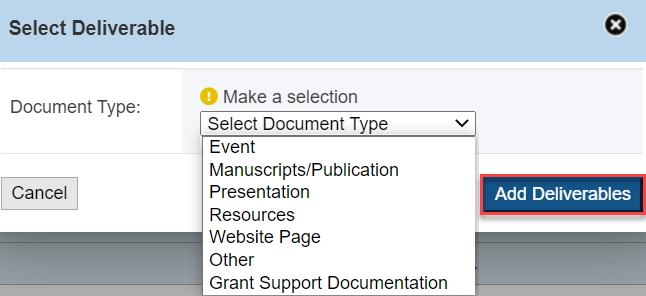
| 10 | You will see a popup window appear prompting you to select the Document Type. Choose the Deliverable type from the dropdown and click on the Add Deliverables button.
| ||
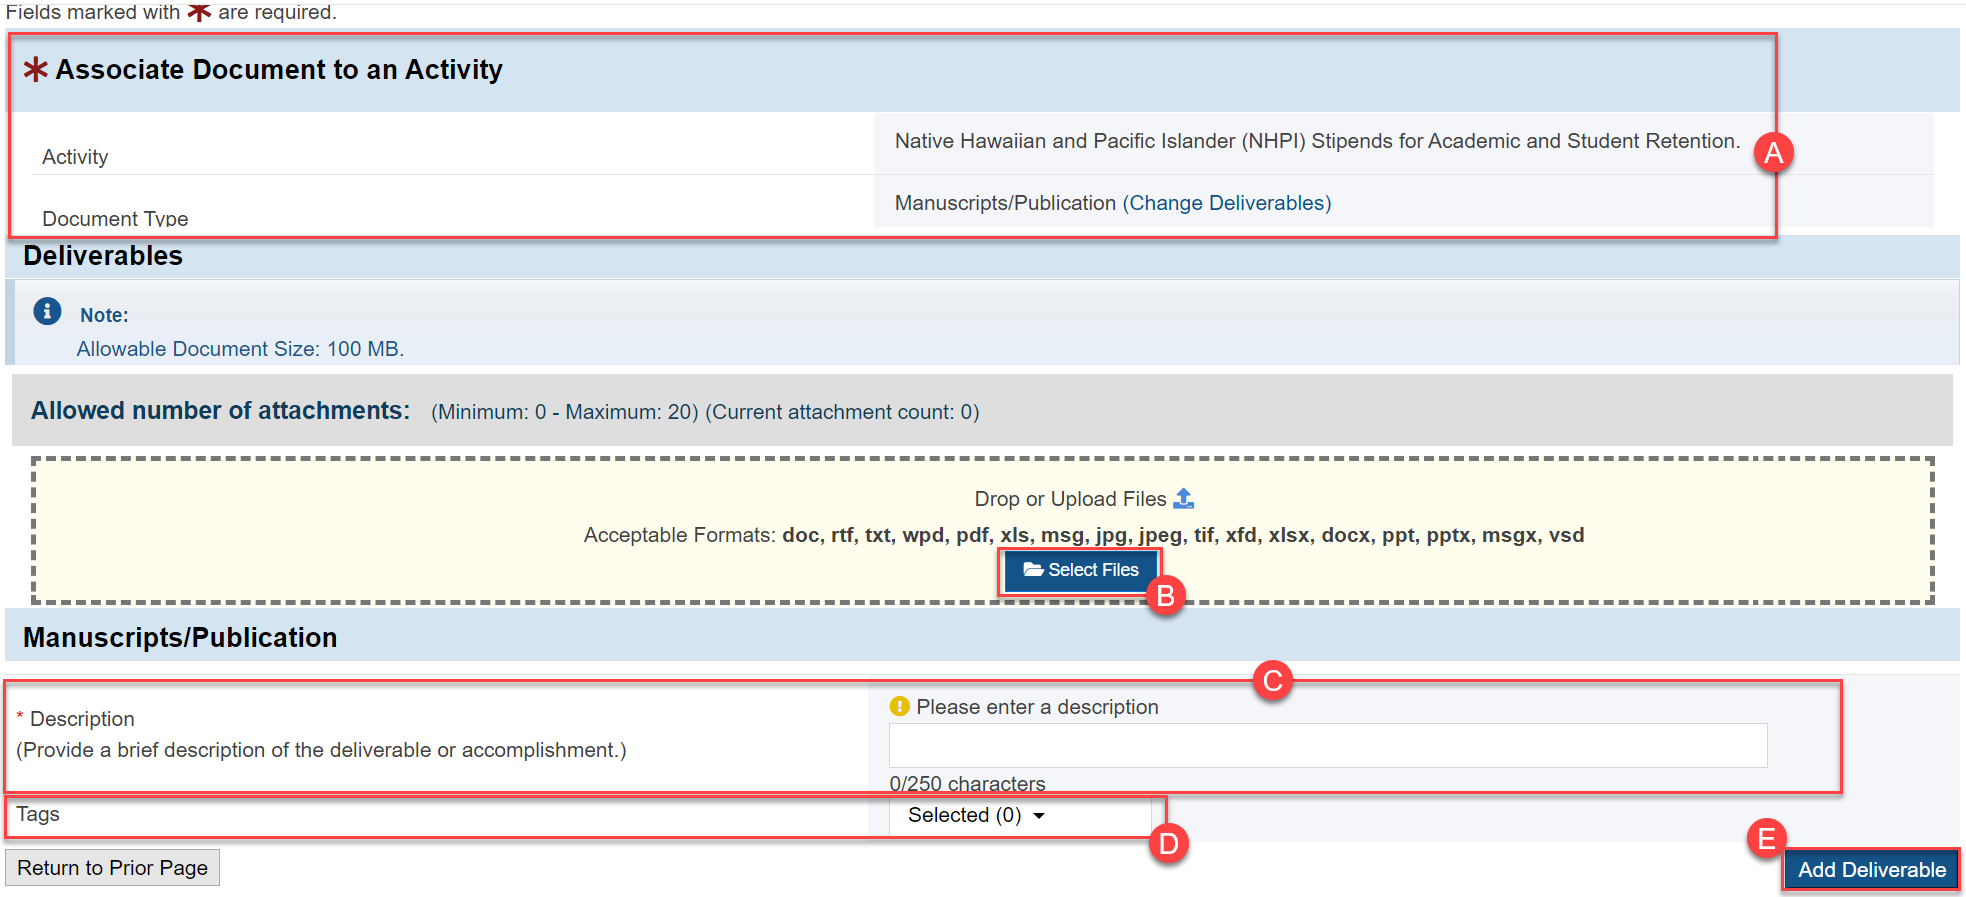
| 11 | You will be navigated back to the Deliverables/Accomplishments – Upload Page and you will be able to attach any document to the selected Deliverable type and add in details associated to it.
A. You will see the Activity the Deliverable is being uploaded for. You will see the Document Type as selected in the popup window earlier. You can change the Deliverable at this point if needed by clicking on Change Deliverables. B. Clicking on the Select Files will allow you to browse and select an attachment file that you wish to upload. C. You can then provide a description to this file/deliverable if needed. D. You can choose from any of the Tags available. E. Finally click on the Add Deliverables button to save all the information entered. | ||
| 12 | You will then be navigated back to the Deliverables/Accomplishments Upload page where you can see the Deliverable that you added.
You can click on Update to make changes to the information entered. Clicking on the Return to Previous Page will take you back to the Quarterly Progress Update – Activities page. | ||
| 13 | On the Quarterly Progress Update – Activities Page you can see the deliverable you attached to the Activity.
| ||
Adding Comments | |||
| 14 | You can add comments to an Activity if needed. Click on the Comments icon under Options.
| ||
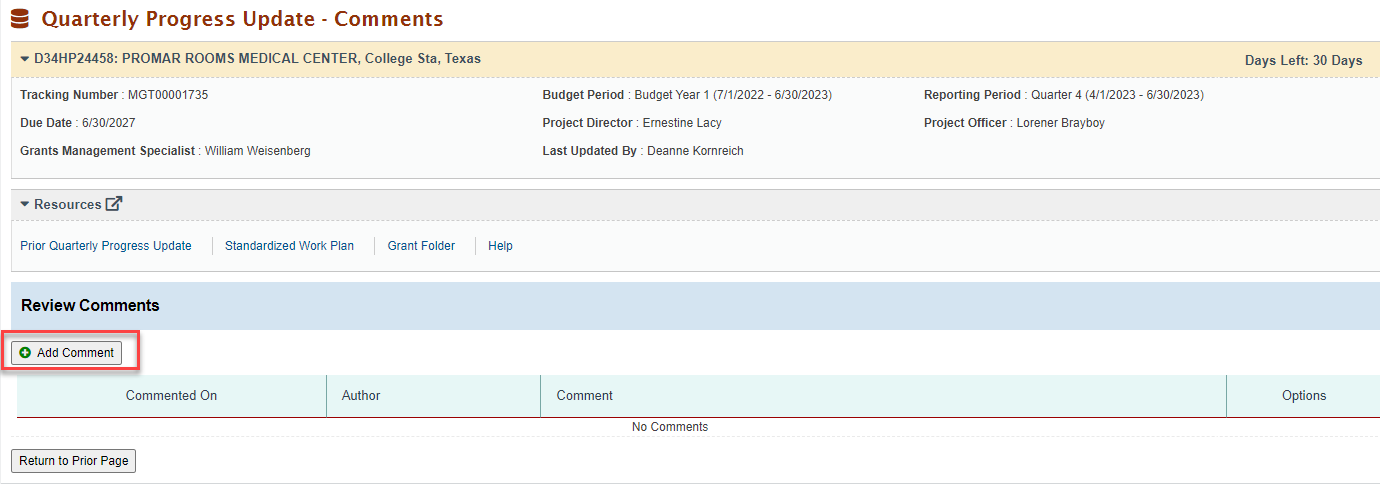
| 15 | This will navigate you to the Comments page. Click on the Add Comments button.
| ||
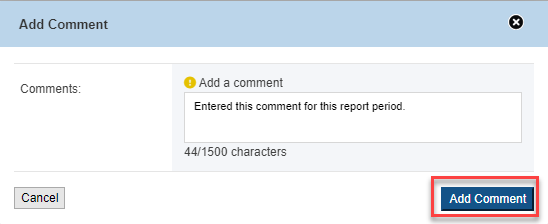
| 16 | You will see a popup window where you can add your comment. Click on the Add Comment button to save the comment and navigate back to the Comments page.
| ||
| 17 | On the Comments page you can see your comment listed in the Review Comments section. In the Options column, you can click the delete button to delete the comment. You can also click on Return to Previous Page to go back to Quarterly Progress Update – Activities page, and you can see that a comment has been added to the Activity.
| ||
| 18 | Back on the Quarterly Progress Update – Activities page you can see the comment added as indicated in the comment section.
| ||
Updating Activity status across all Objectives and Goals | |||
| 19 | Continue updating the status of each Activity within the Objective. Once all Activities under the selected Objective are updated, click on Save (or Save & Continue if there are multiple Objectives left to provide status) to save the information. You can move on to reviewing the next Objective. This can be done via the page buttons or the Navigational footer available.
| ||
| 20 | You will receive a popup message that the Objective is successfully saved.
| ||
| 21 | You can move on to updating the next Objective and Activities within the Goal. Once all the Objectives within a Goal have been updated, you can move on to the next Goal for the reporting Period. | ||
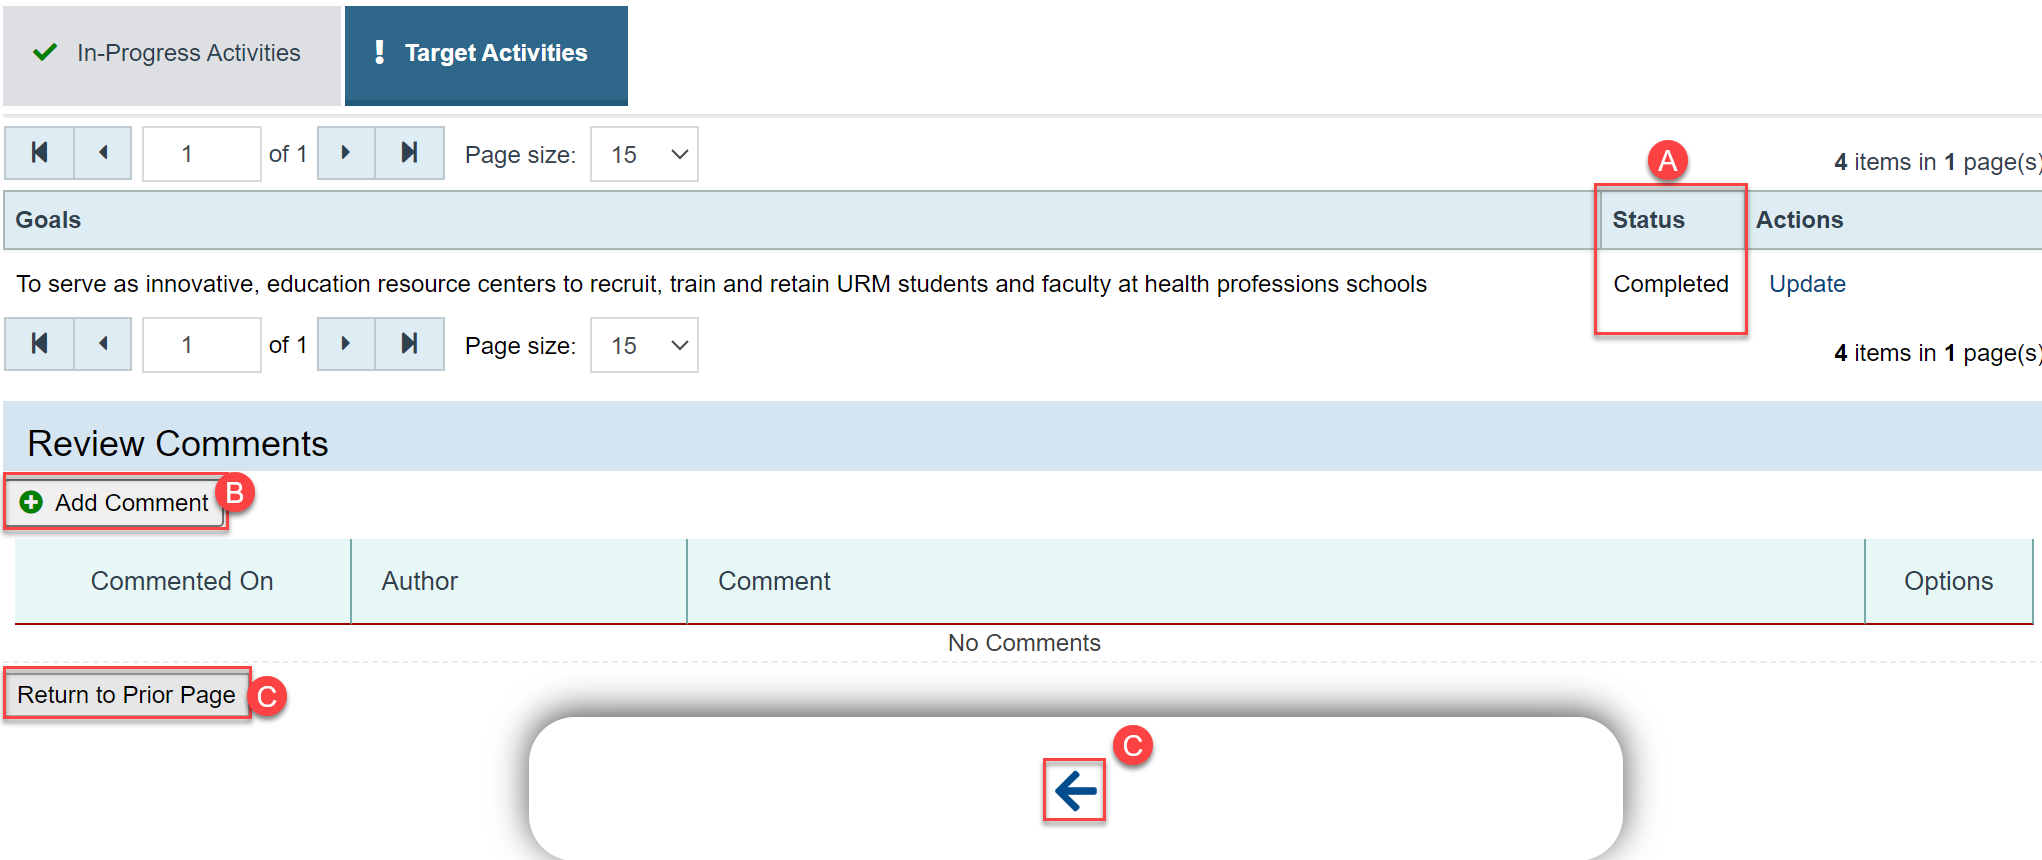
| 22 | Follow the same steps to complete updating the progress status of all Activities, Deliverables and Comments. Once all the Goals are updated navigate back to the Quarterly Progress Update – Activities Page where all the Goals are listed.
A. You will notice that the Status of all the Goals has changed to Completed. B. You can Add a Comment in this page if needed. This will be a comment for the entire reporting period that the PO will be able to view at the time of your QPU review. C. Clicking on the Return to Prior Page button will navigate you to the QPU – Status Overview Page. This can be done via the page buttons or the Navigational footer available. | ||
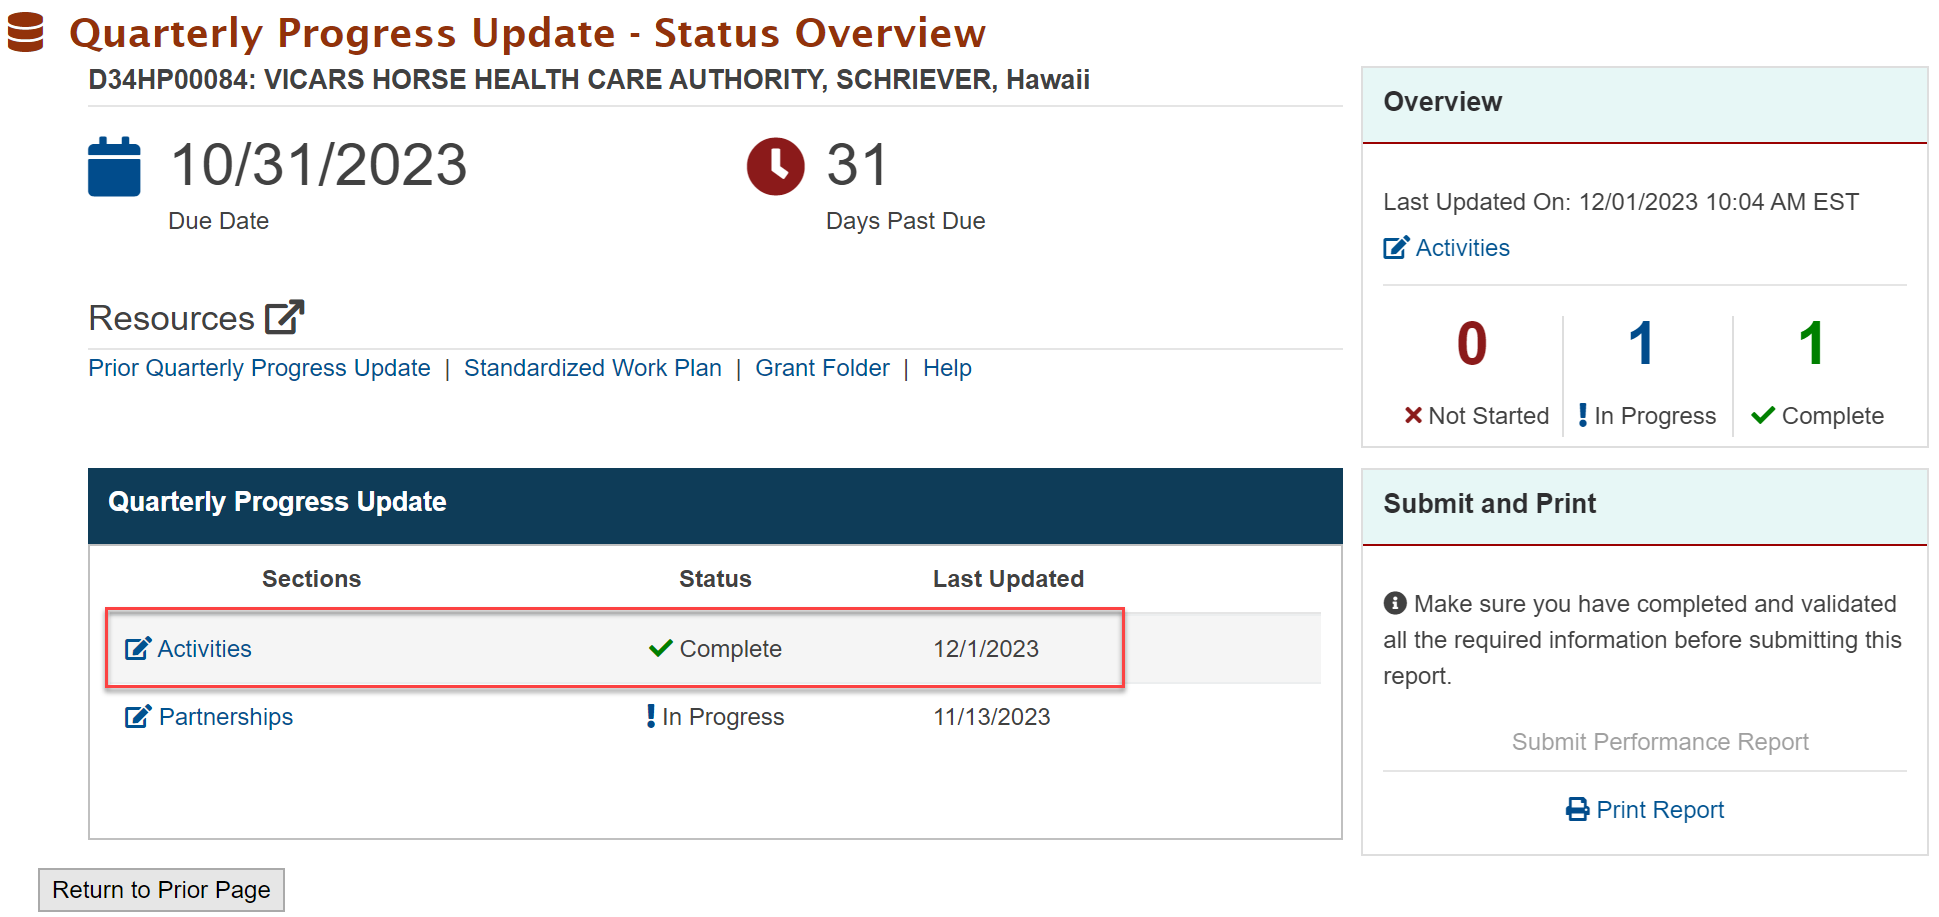
| 23 | On the Status Overview page you can see that the Status of your Activities has changed to “Complete”. You will also see details of the last updates made to this form in the Form Overview section.
| ||
Adding Partnership Information | |||
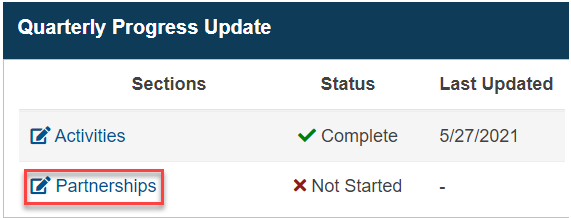
| 24 | Click on the Partnerships link in the Quarterly Progress Update section of the Status Overview page to update your Partner Information.
| ||
| 25 | You will land in Partnerships Page where you can update your partner information if needed.
| ||
| 26 | If you have Partnership information to enter for this reporting period, click on the Add Partner Information button.
| ||
| 27 | After clicking on the Add Partner Information button, you will land on the Partnerships page.
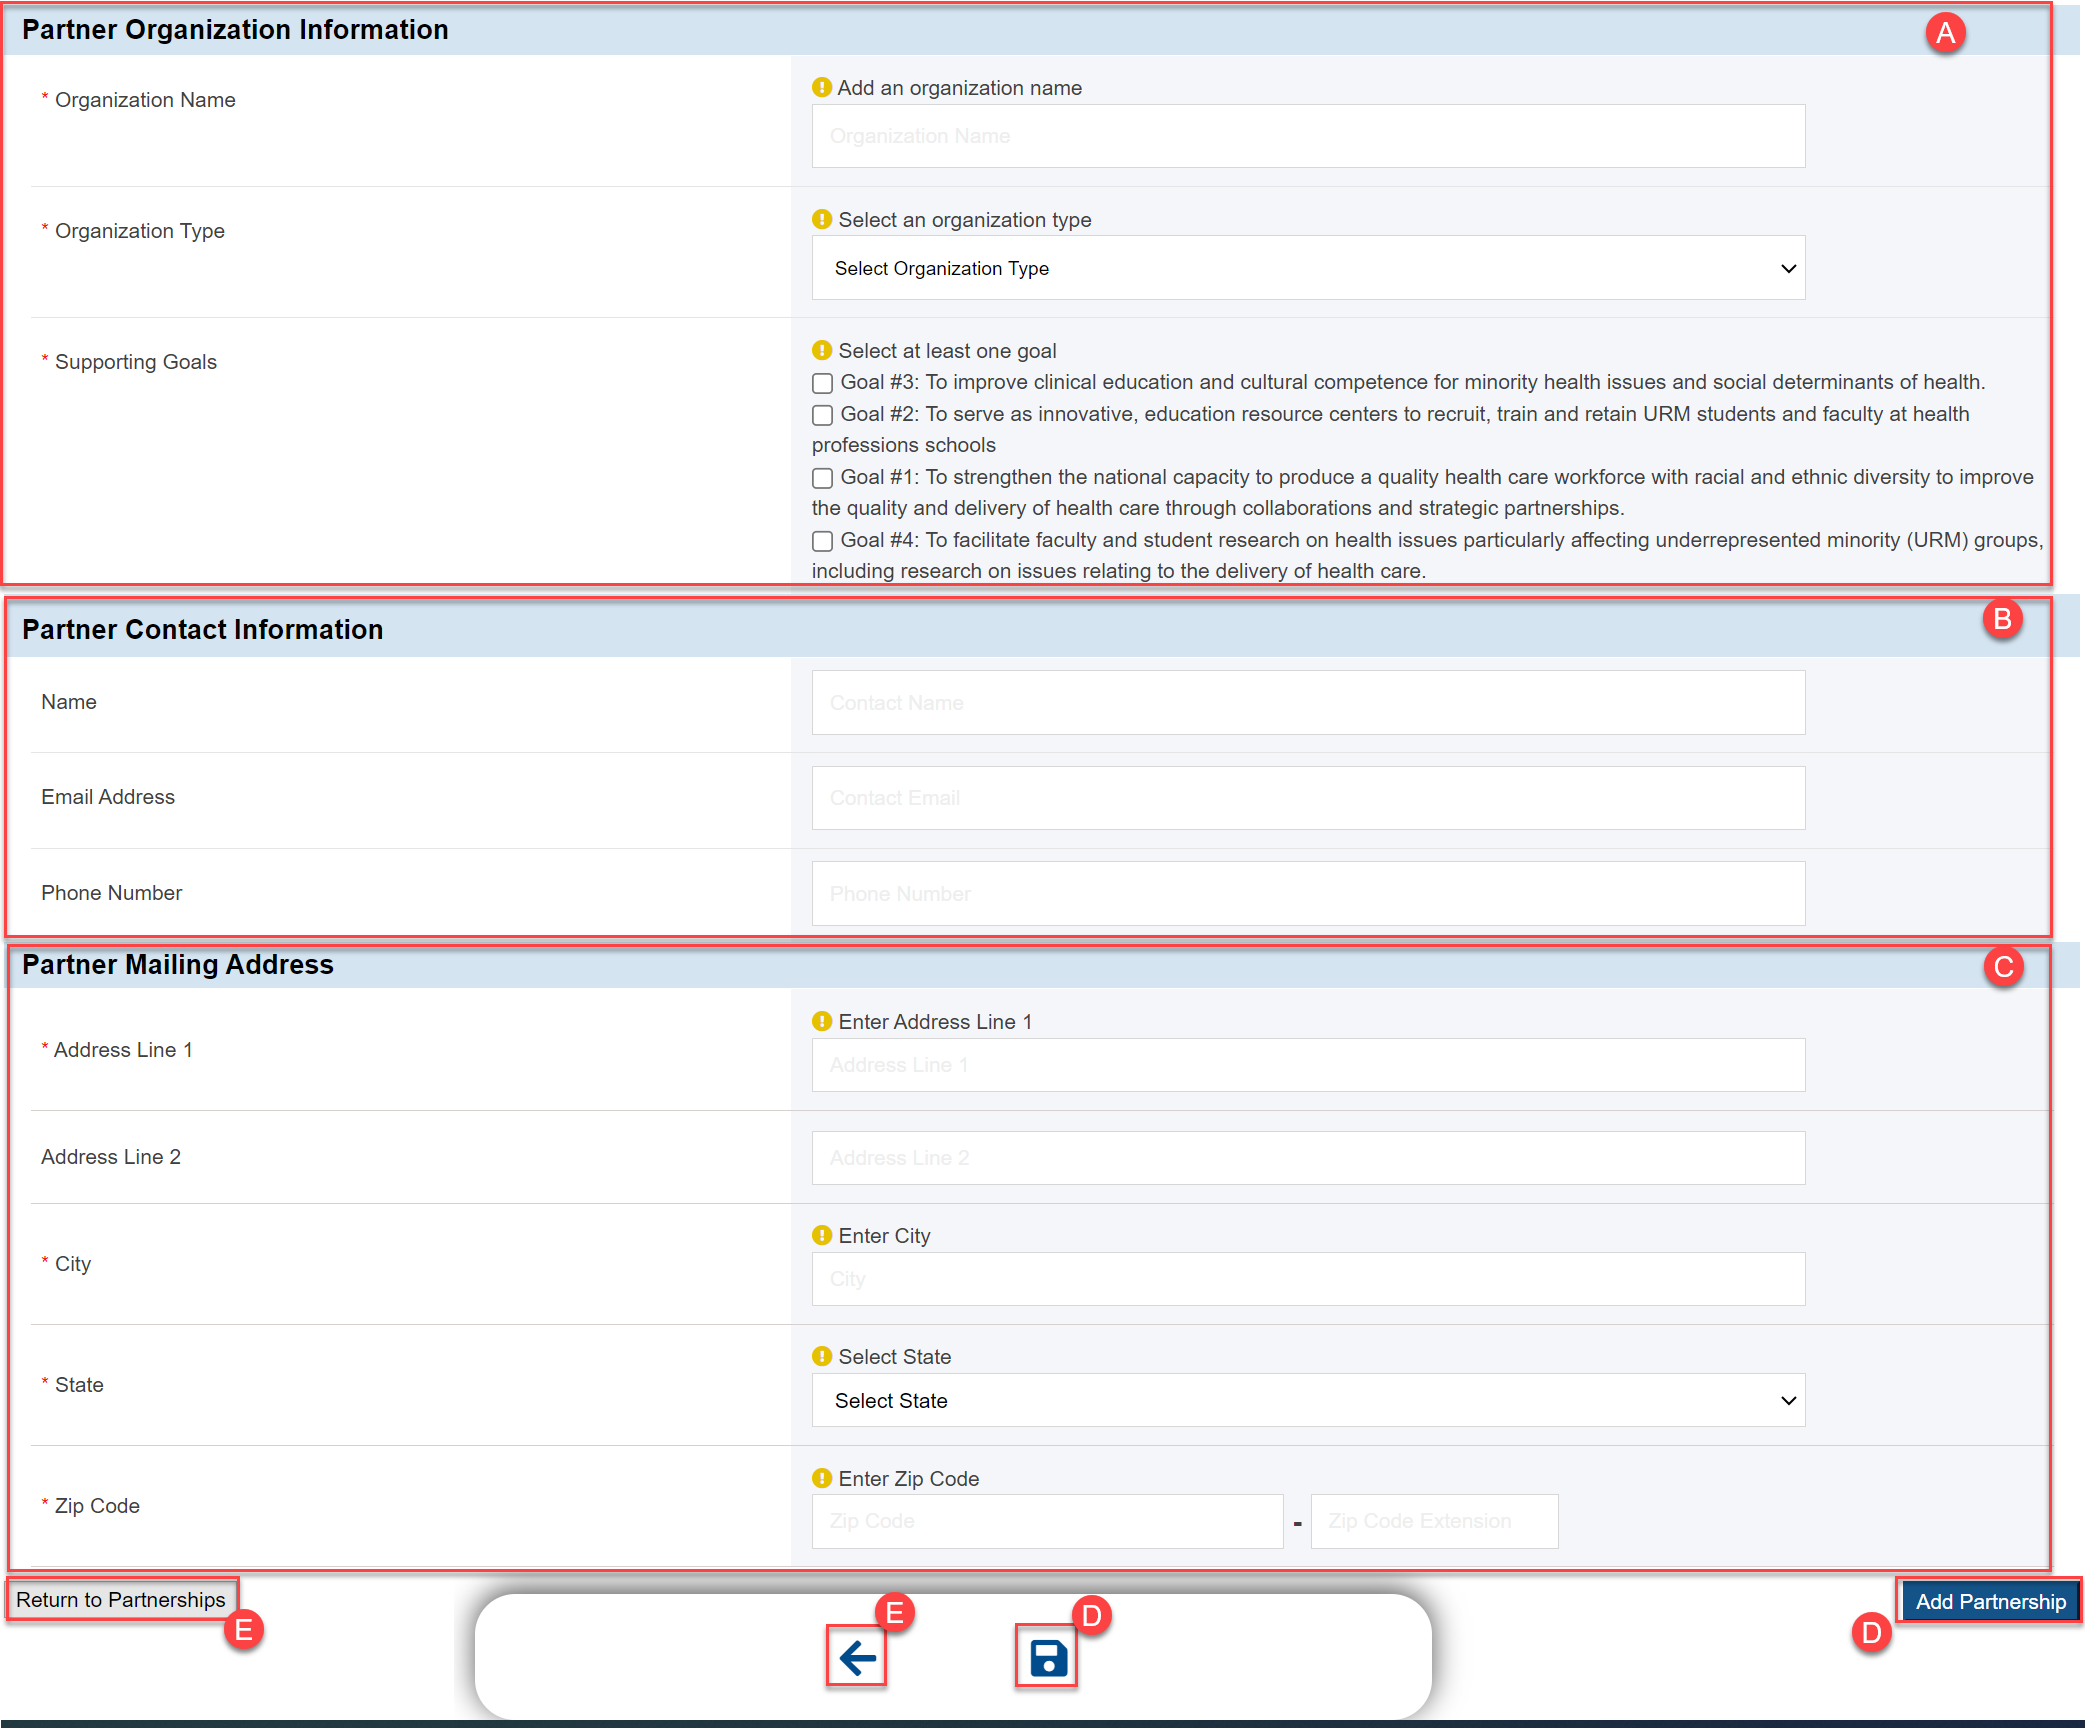
On this page you will see the following: A. Partner Organization Information where you can enter the Partner’s Organization Name, Organization type, and associate the Partner to the Supporting Goal within the reporting period. Note: These are all required fields and you will see an error message if they are not all completed. B. Partner Contact Information where you can enter the Partner’s Name, Email Address and Phone Number. C. Partner Mailing Address where you can enter the Partner’s address. Note: These are required fields and the system will not allow you to proceed if not entered. D. Clicking the Add Partnership button will start the address standardization. This can be done via the page button or the Navigational footer available E. Clicking the Return to Partnerships button will navigate you back to the prior page. This can be done via the page button or the Navigational footer available. | ||
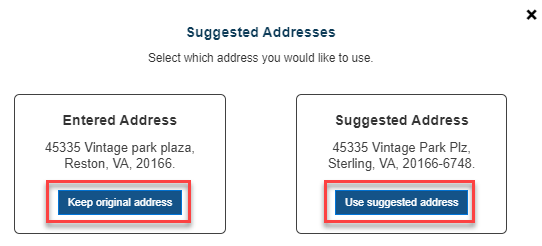
| 28 | When you enter the address, and click the Add Partnership button, the system will show you the Suggested Address as per the US postal service in a popup window and the address as it was entered. You have the option to save the Suggested Address by clicking the Use suggested address button or the Entered Address by clicking the Keep original address button.
| ||
| 29 | Clicking on the address buttons will bring you back to the Partnerships page.
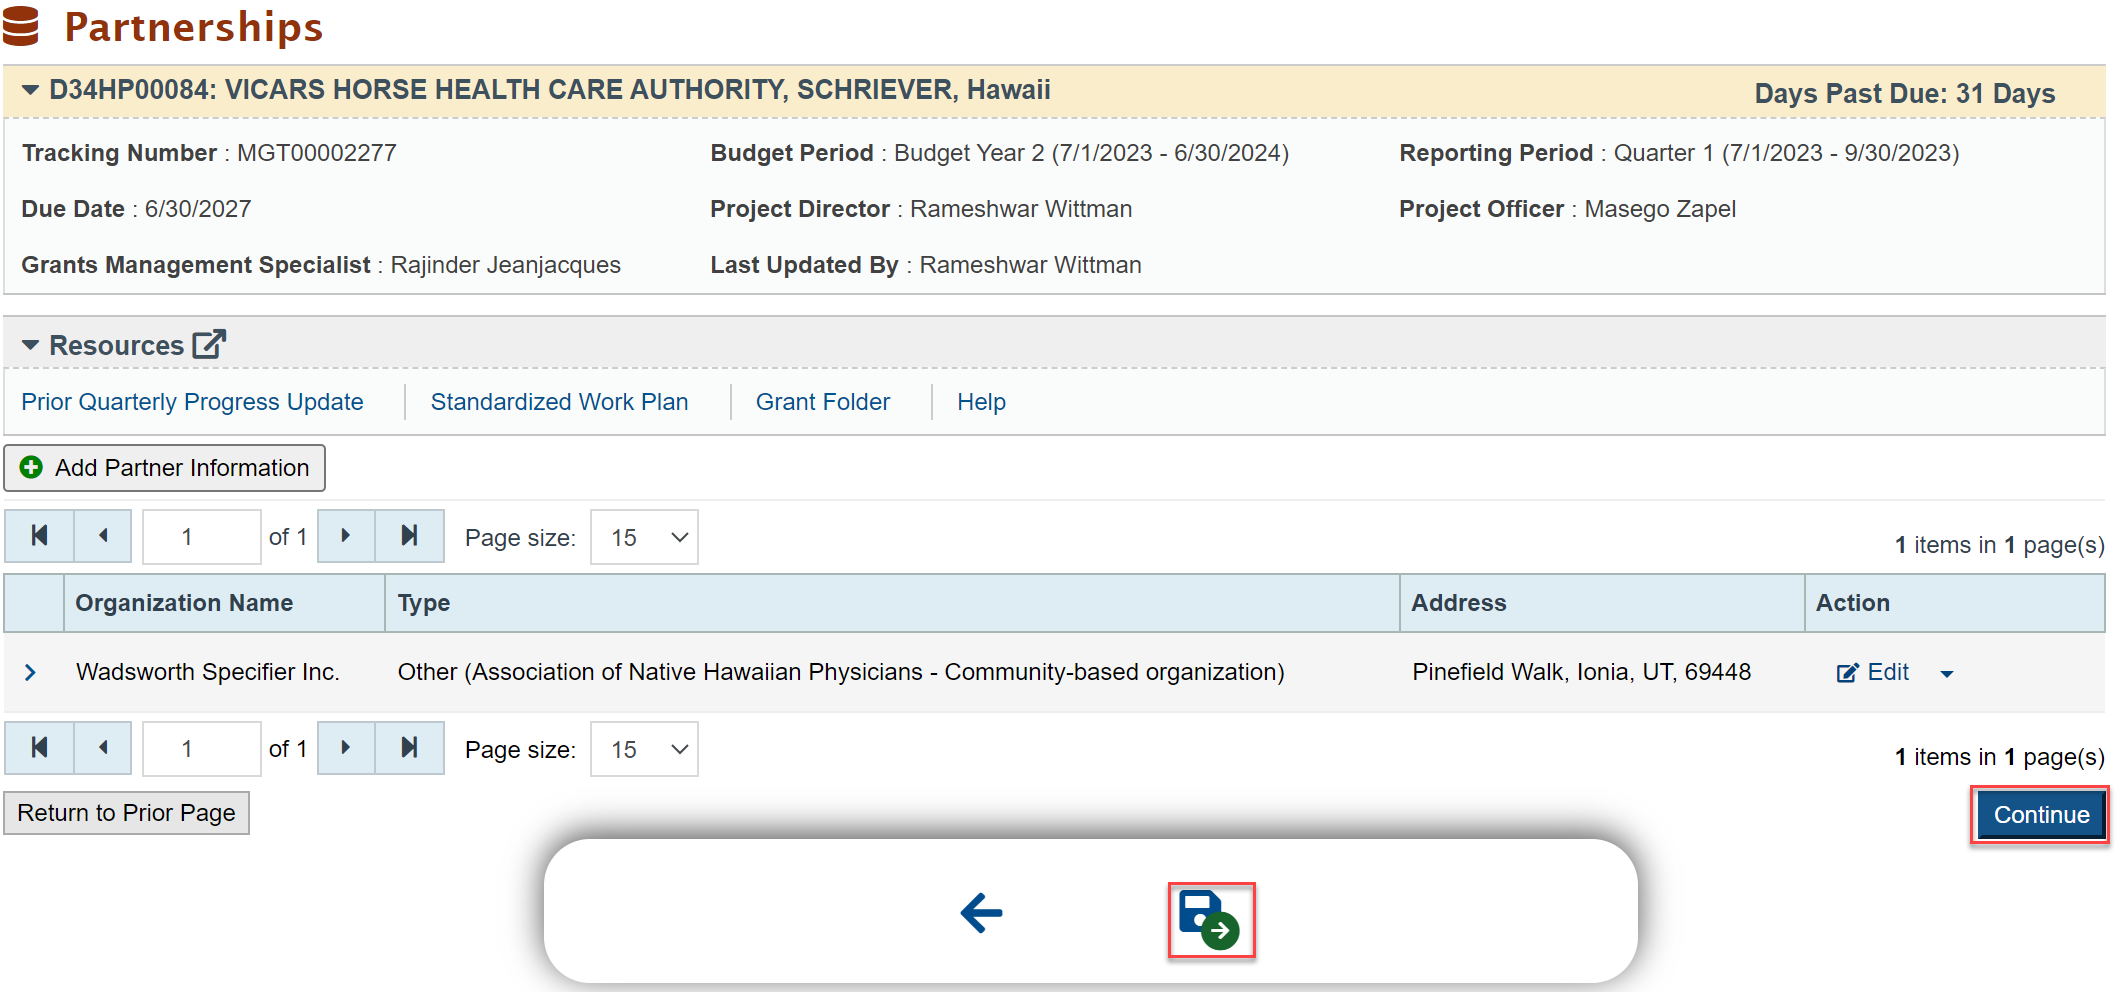
On this page you will see the following: A. New Partner Information listed which includes the Partner’s Organization Name, Type and Address. B. Options to Edit and Delete the partner information and Manage MOU under Actions.
C. Continue button that will navigate you to the QPU - Status Overview page. This can be done via the page button or the Navigational footer available. You can add multiple Partners if you need to for the reporting period. Click on the Add Partner Information button to add more Partners. | ||
Submitting your QPU | |||
| 30 | Once the Activities and Partnership sections are complete, you are now ready to Submit your QPU.
On this page you will see the following. A. The Status of Partnerships has changed to Complete. B. The last updated information in the Forms Overview section. C. Submit Performance Report link that will allow you to submit your QPU. D. Print Report link that will allow you to print the QPU. | ||
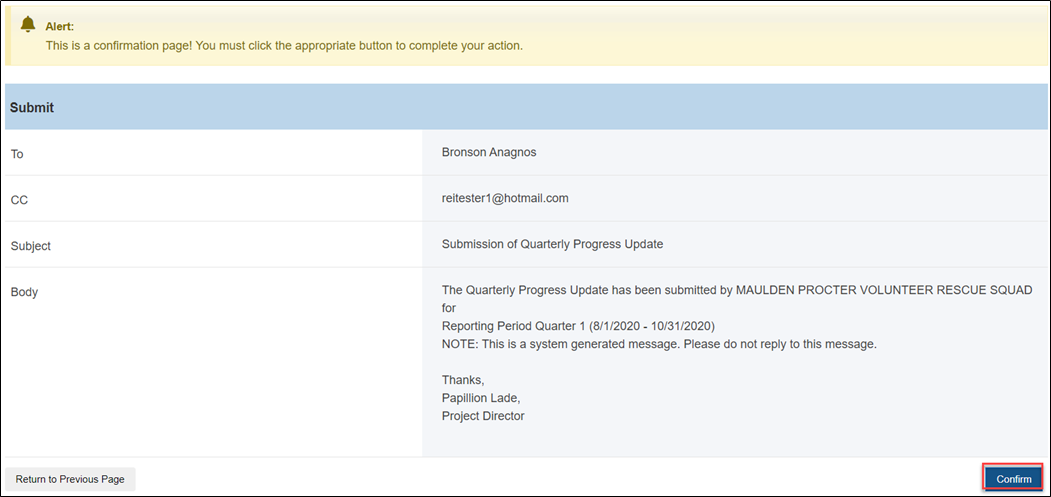
| 31 | When you are ready to submit the QPU, click Submit Performance Report and you will land on the Confirmation page. Verify that all the QPU information shown here is accurate. Click on Confirm to submit your QPU. An email notification will also be sent about your submission to the HRSA PO.
| ||
| 32 | This completes the QPU submission process. | ||

