Enhancements to the Uniform Data System were made available in the EHBs on 9/13/18. Additional enhancements have also been added to UDS on 11/11/2019 and those updates are included below. This instructional page was created using fake data, solely for the purpose of training and testing. |
UDS Performance Report Navigation Modernization | ||
|---|---|---|
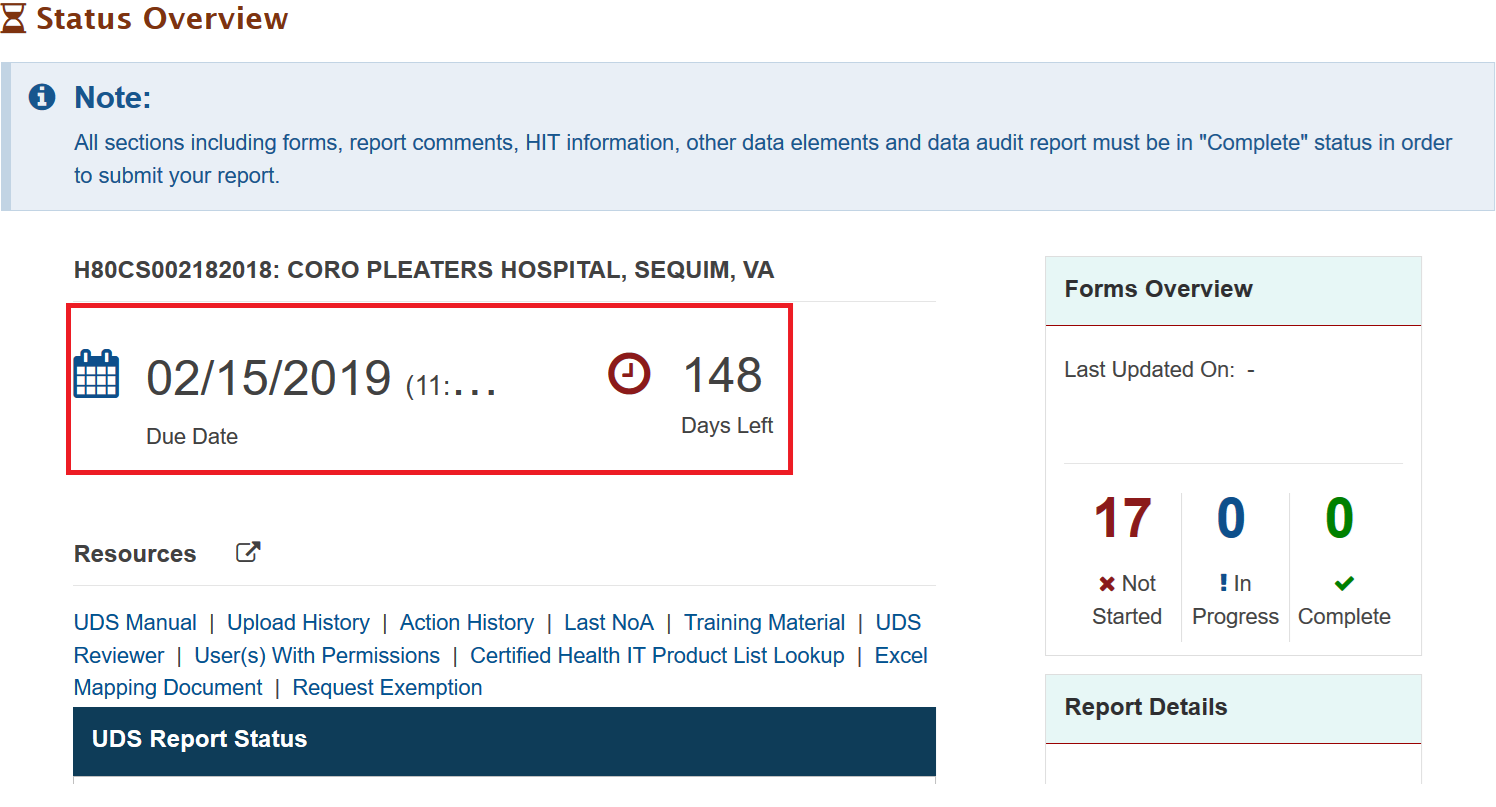
1. | The Status Overview page has been updated significantly and now displays several new panels. | |
2. | The top of the Status Overview page shows the UDS Performance Report due date and the number of days left till the submission period ends. |
|
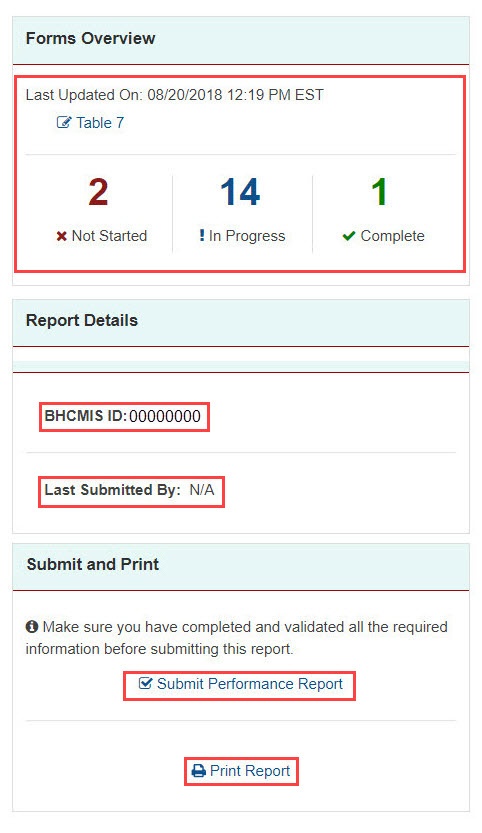
3. | Several functionalities and sections are located on the right side of the Status Overview page:
|
|
4. | The Status Overview page UDS Report Status section has changed in appearance:
|
|
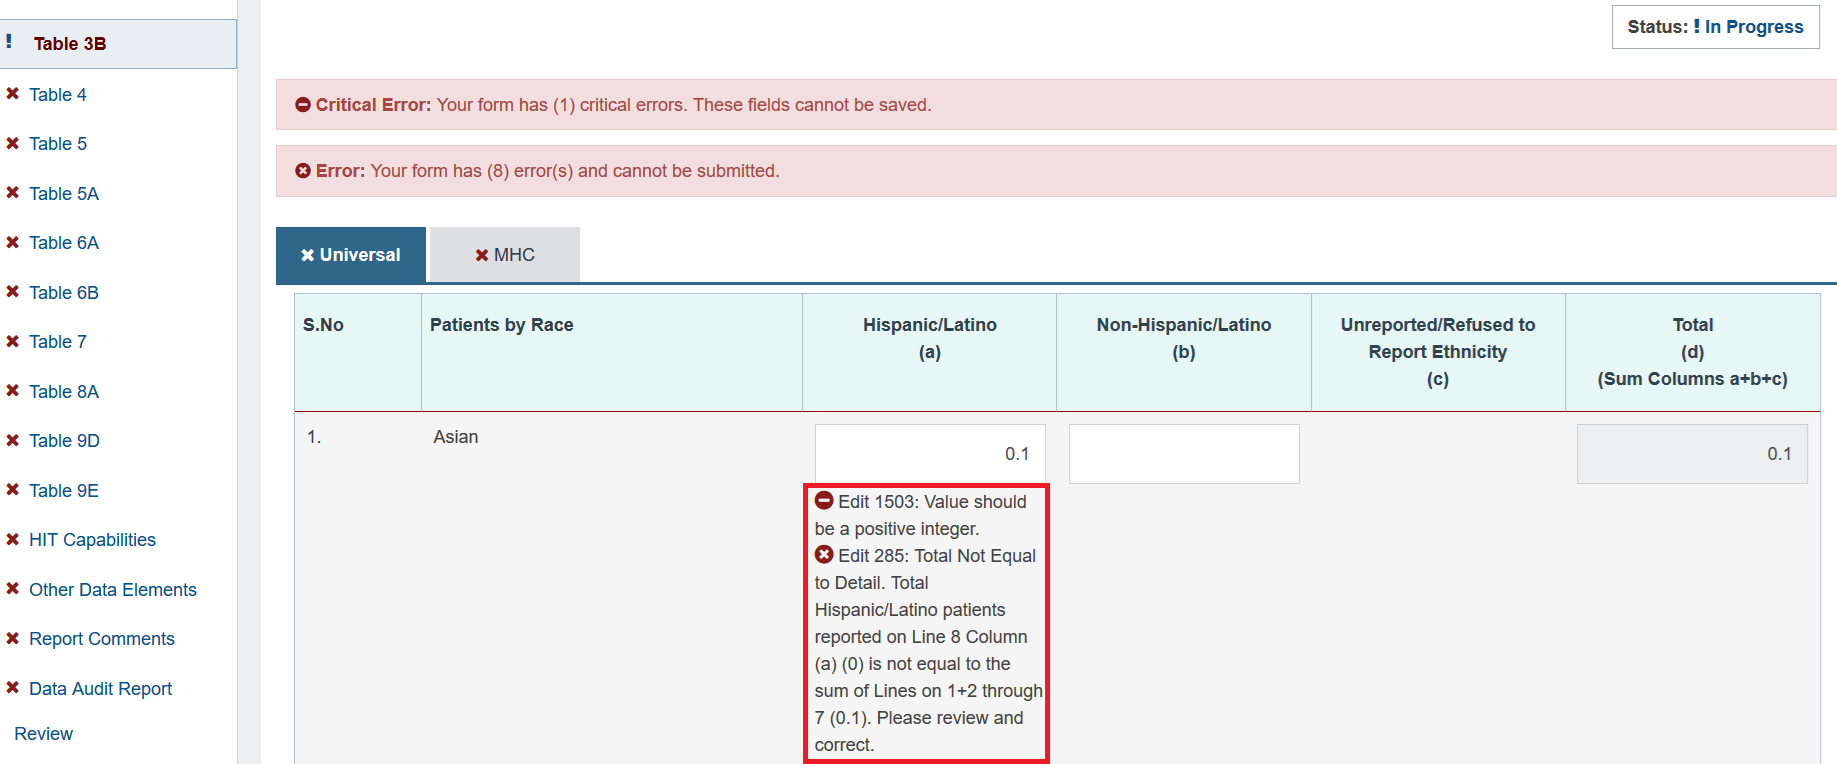
5. | At the table level, several enhancements have been made:
|
|
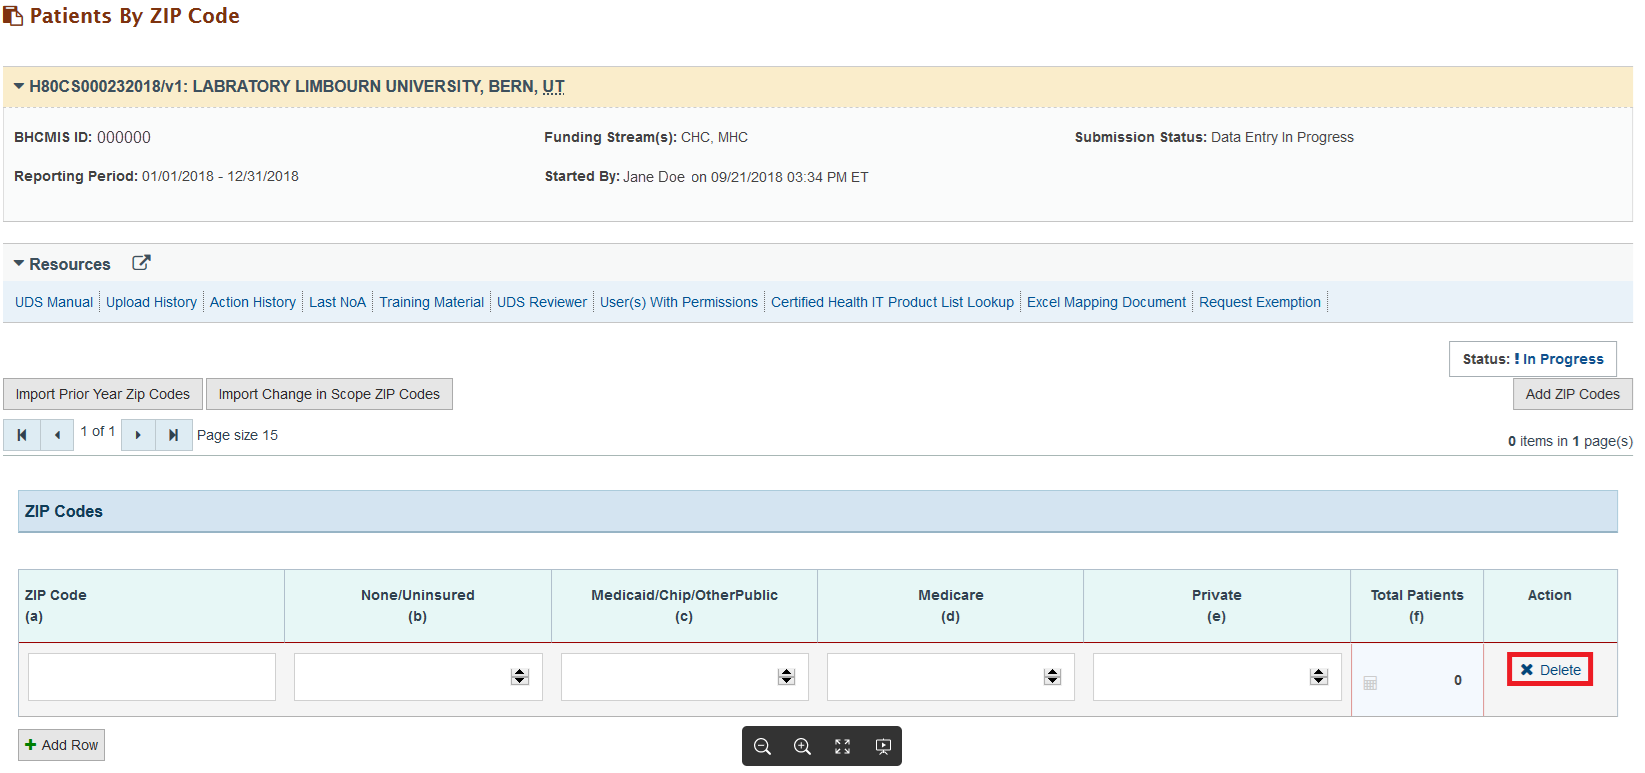
6. | The Delete function has been added to the Patient By ZIP Code. Click Delete to remove a single row as needed. |
|
7. | On all table pages, the 'Mark as Complete' action has been removed, as pages now automatically checks pages for completion, reducing the number of clicks. |
|
Offline Excel Feature | ||||
|---|---|---|---|---|
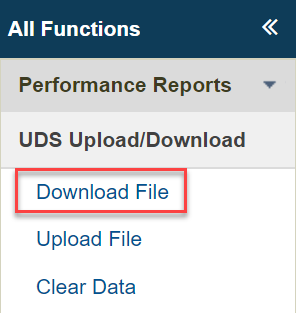
1. | The Offline Excel Feature is a downloadable excel template of the UDS Performance Report forms where you can perform data entry without being connected to the internet and upload the completed Excel file to the EHBs.To access the Offline Excel feature, click the Download File link in the left-hand menu from the ‘Status Overview’ page. This will open the ‘Download File’ page. |
| ||
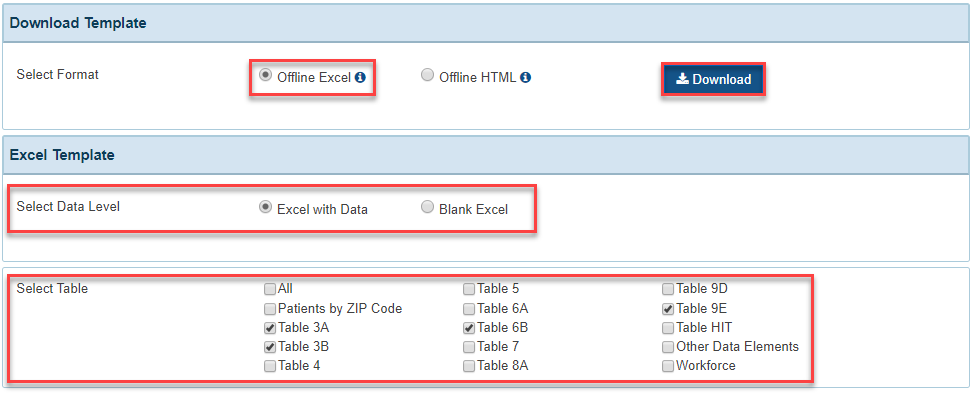
2. | On the ‘Download File’ page, scroll down to the Download Template section. Select the Offline Excel option and select Excel with Data or Blank Excel. Then check the tables and forms you would like to download. You can choose to download the tables individually, in groups, or all the tables. After you have made your selections, click the Download button. This will initiate the download of the offline excel.
|
| ||
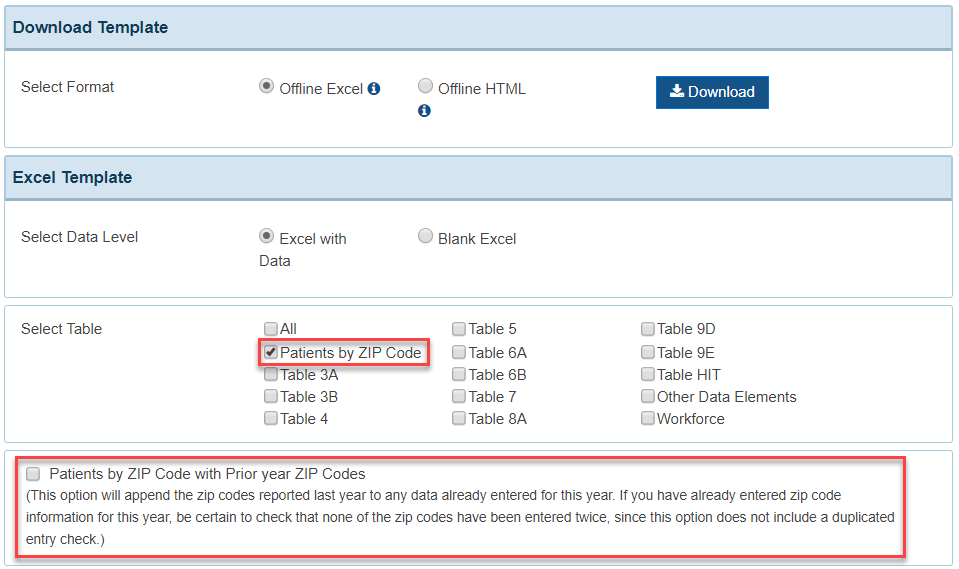
3. | If you select to download the Patients by ZIP Code table, you have the option to include a list of prior year ZIP codes, making it easier to enter data if the ZIP codes are similar to those used the previous year. This is not an option available if you download the Offline HTML format. |
| ||
4. | Open the downloaded file and save it to your computer. Each of the tables and associated funding streams are organized in Excel worksheets. Complete data entry on each of the worksheets. The Note at the top of each worksheet provides details of what kind of information should be entered. |
| ||
5. | From the UDS Report Resources section, open the Excel Mapping Document to help navigate the Excel file. |
| ||
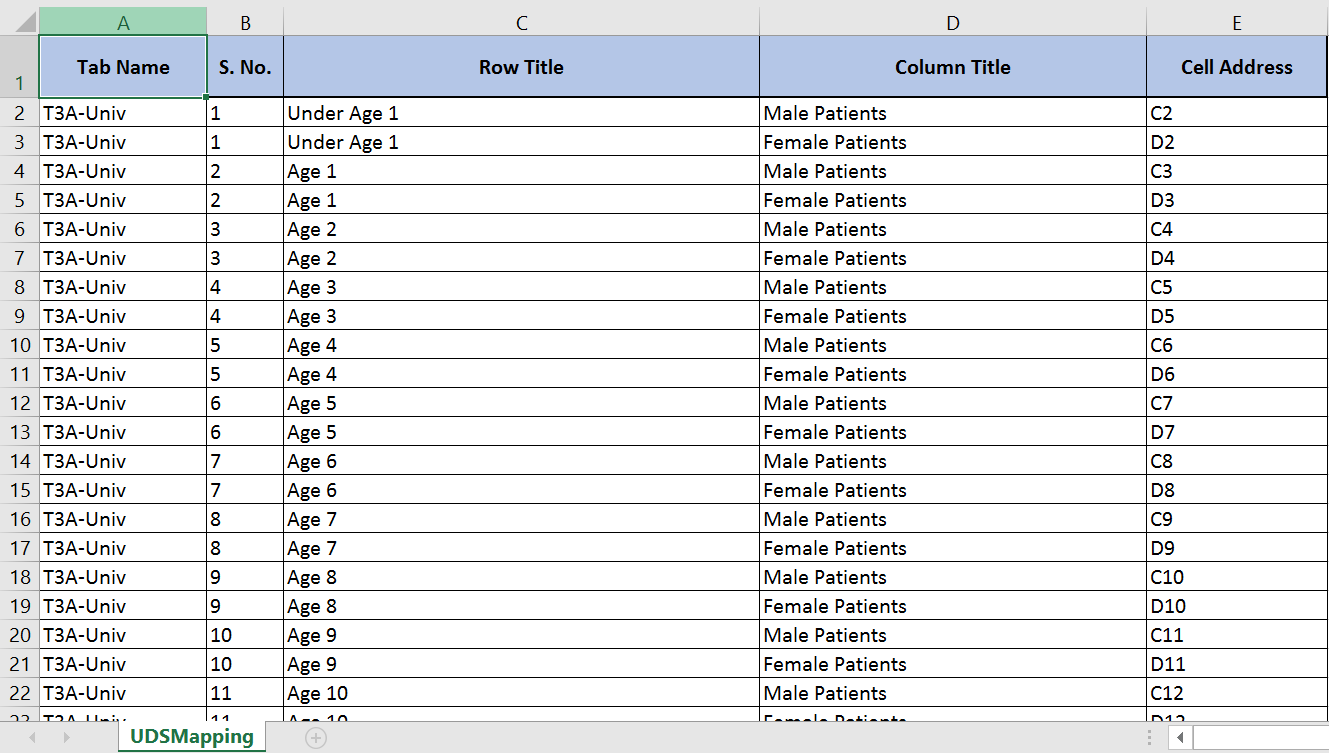
6. | The Excel Mapping Document lists the corresponding cell location for all the fields in the offline Excel file. |
| ||
| ||||
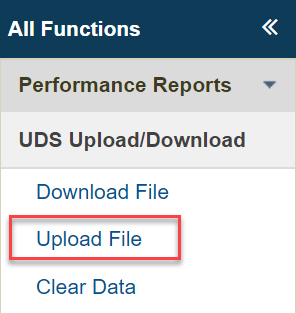
7. | To upload the offline Excel file, from the ‘Status Overview’ page, click Upload File in the left-hand menu. |
| ||
| ||||
8. | On the ‘Upload File’ page, scroll down to the Upload File section. Click the Browse button and select the Excel file that you just saved. Return to the ‘Upload File’ page and click the Process File button to upload the data in the Excel file and generate the Error Summary report. |
| ||
| ||||
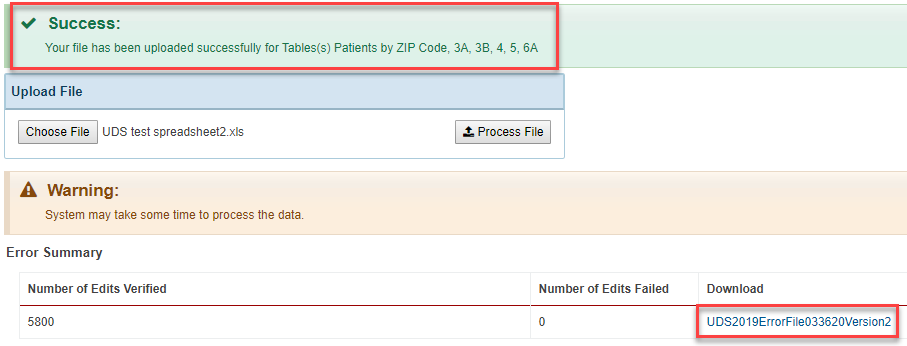
9. | Once the Excel file has been uploaded and processed, the EHBs system will assign it a file name that contains your UDS Report tracking number and the version number. The version number will allow you to track the most recently uploaded file. | |||
10. | A success message also displays when the system has finished uploading and processing the Excel file. This message includes a list of the table(s) that were uploaded.In the Error Summary section, the "Number of Edits Verified" and "Number of Edits Failed" values will display after the file is processed. The Error Summary Report can be downloaded by clicking the file link in the Download column. |
| ||
11. | The Error Summary Report file shows the edit codes, error messages, and the tables and funding streams where the errors have occurred. Use this file to make corrections to the data. |
| ||
12. | Click the Upload History link in the UDS Reports Resources section to access previously uploaded Offline Excel files. |
| ||
13. | The Upload History page includes the following columns of information.A. Document Name - Provides a hyperlink to quickly view the uploaded file.B. Table(s) - Lists all tables uploaded in the file.C. Error File - Provides a hyperlink to view the error file associated with the upload. With this new feature there will be record of the error file for each upload.D. Uploaded File Name - Shows the original source file name for the uploaded document. |
| ||
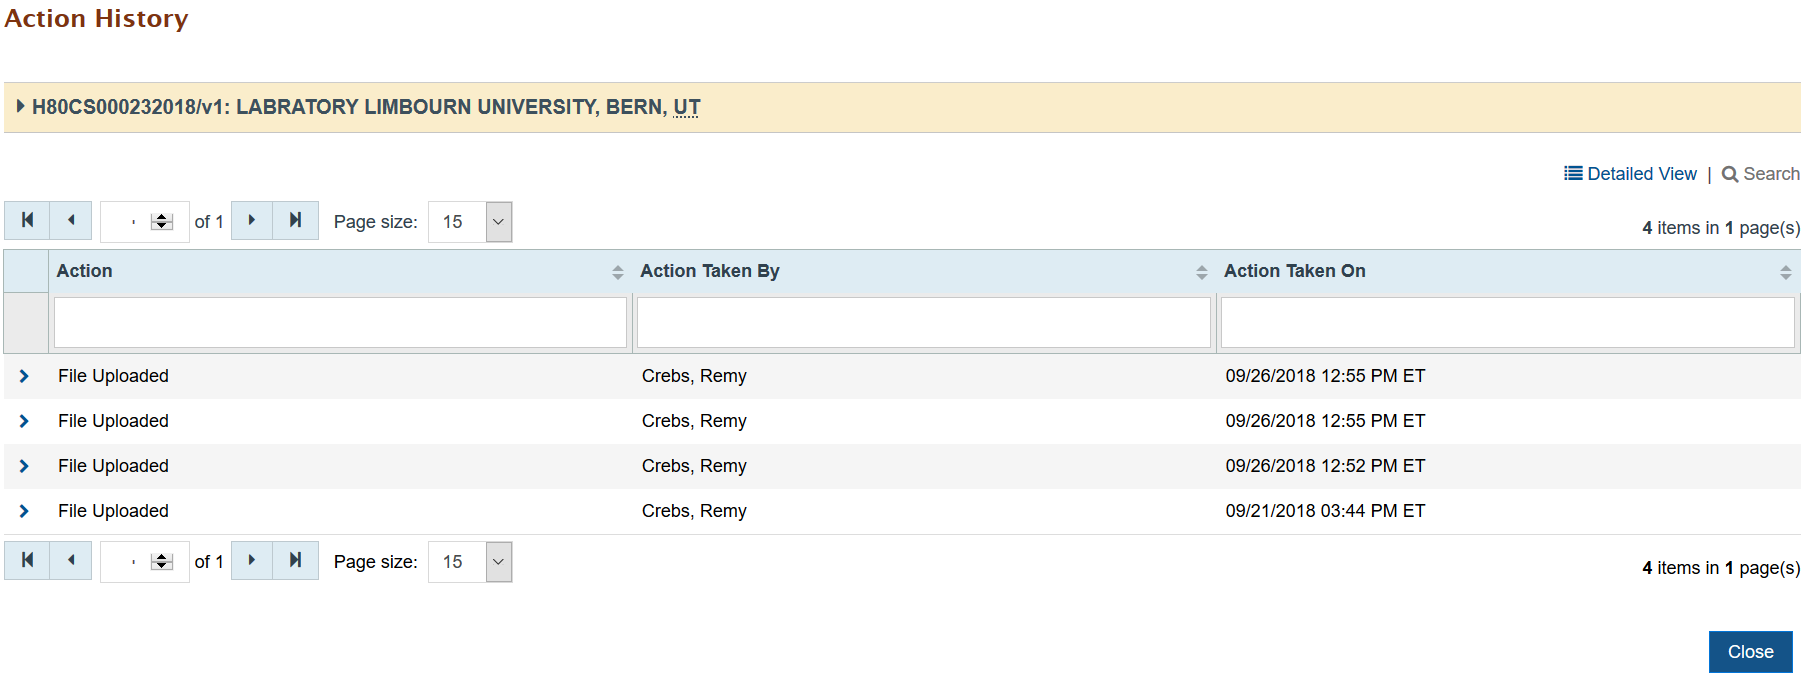
14. | Click the Action History link in the UDS Report Resources section to view the history of file uploads. |
| ||
15. | The list of uploads will display along with other actions, including report submission. |
| ||
Offline HTML Feature | |||
|---|---|---|---|
1. | The Offline HTML Feature is a downloadable HTML application that has a similar UI to the EHBs, basic table functionalities, and field edits. You can perform data entry on this application, save their data, and export data in an Excel file. You must have Google Chrome installed to use to the Offline HTML feature. Data can only be exported from the Offline HTML in an Excel file, which can be uploaded to the EHBs.From the ‘Status Overview’ page, click the Download File link in the left-hand menu to access the Offline HTML feature. This will open the ‘Download File’ page. |
| |
2. | On the ‘Download File’ page, scroll down to the Download Template section. Select the Offline HTML option and check the tables and forms you would like to download. You can choose to download all the tables. After you have made your selections, click the Download button. Please note that this will initiate the download of the Offline HTML ZIP file. |
| |
3. | Extract the content of the ZIP file and choose a file location for the extracted content. | ||
| |||
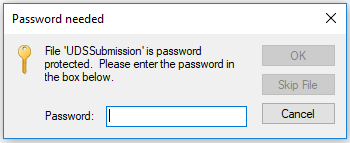
4. | Before completing the extraction, you will be prompted to enter a password, which is your UDS Report tracking number. |
| |
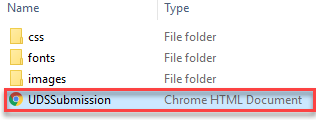
4. | After extracting the ZIP file, open the UDS-Submission Chrome HTML Document. |
| |
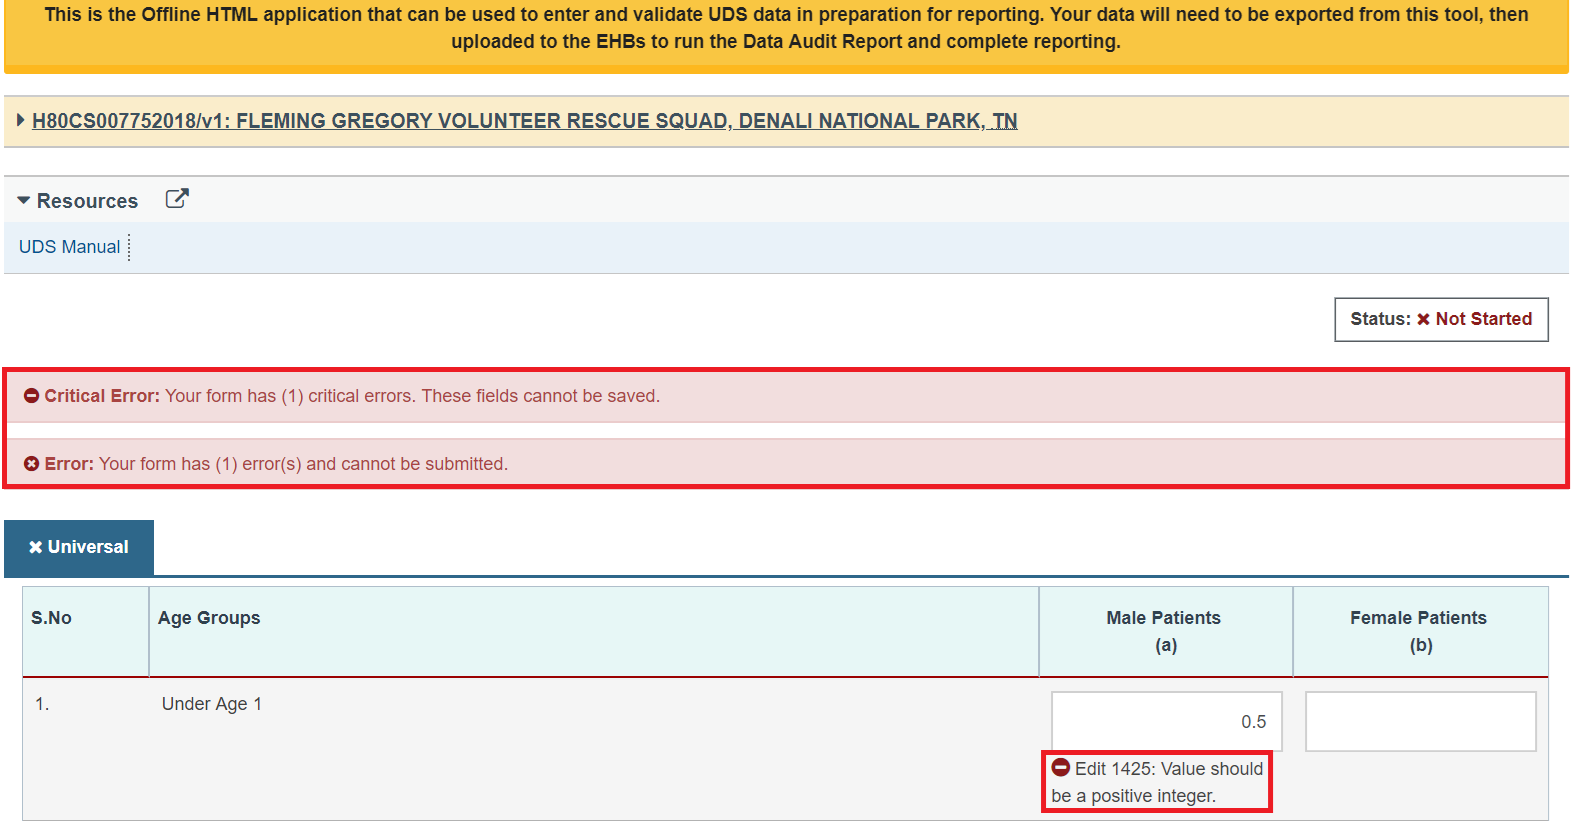
5. | The Offline HTML file retains the UI of the EHBs and will include all the tables that you had selected on the ‘Download File’ page. Because the HTML file looks very similar to the EHBs, the top of each page has an alert to easily identify if you are using the UDS Reporting Environment in the EHBs or using the Offline HTML application. |
| |
6. | Data can be entered directly into this file and saved just as in the EHBs. Data entry checks occur as you enter your UDS Data. |
| |
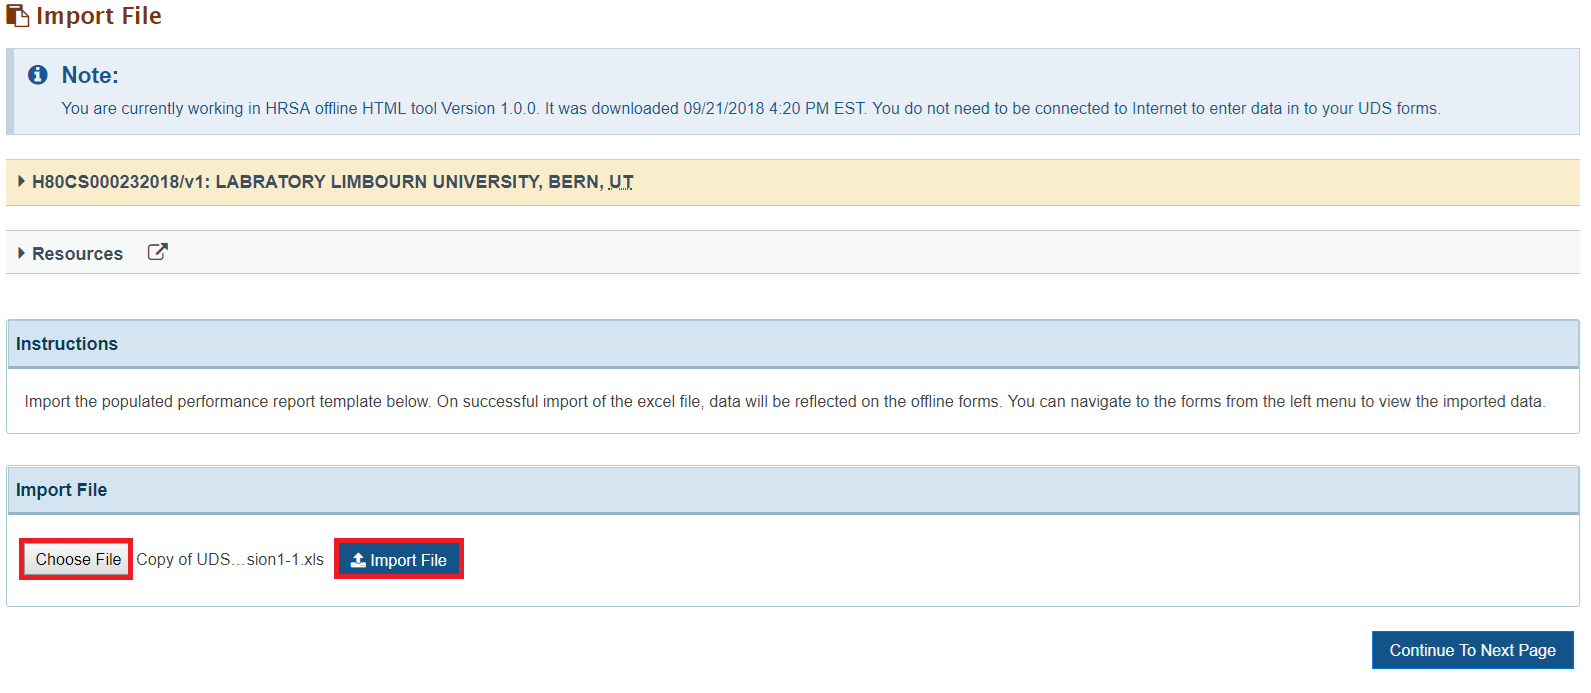
6. | You can import Offline Excel files into the Offline HTML file. This allows users to exchange data between the Offline Excel and Offline HTML functionalities.From the ‘Status Overview’ page, click the Import File button in the left-hand menu. |
| |
| |||
7. | Choose the Excel file you would like to import and click the Import File button. |
| |
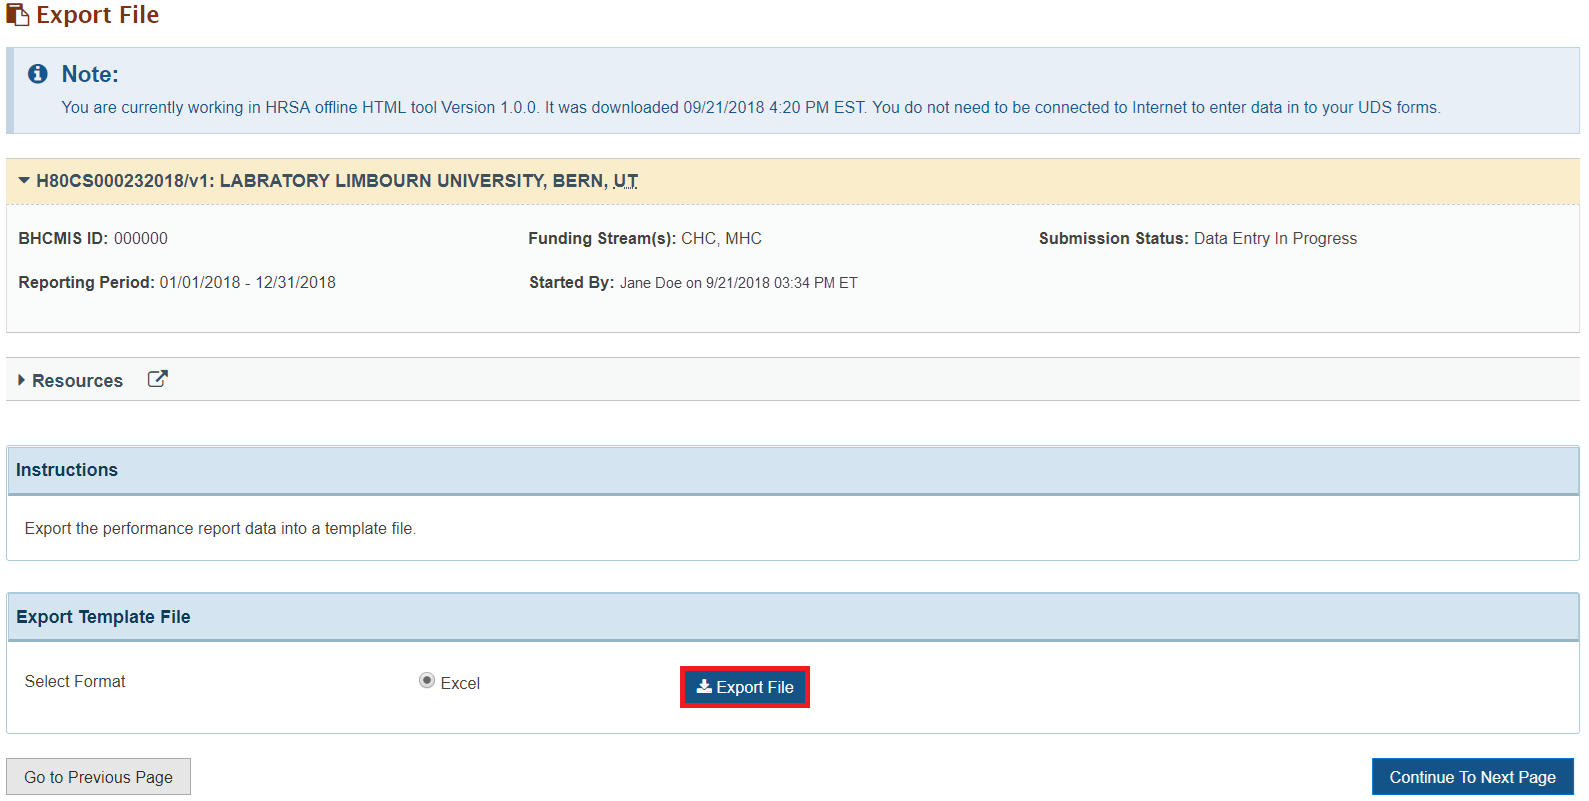
8. | Once data has been entered into the Offline HTML or imported from an Offline Excel file, the data can then be exported from the Offline HTML data as an Excel file.From the ‘Status Overview’ page, open the ‘Export File’ page by clicking the Export File button on the left-hand menu. |
| |
| |||
9. | On the ‘Export File’ page, click the Export File button. This will export the data entered into Offline HTML file as an Excel file. This file can then be uploaded into the EHBs from the Upload File page. |
| |
Preliminary Reporting Environment (PRE) | ||
|---|---|---|
| 1. | The UDS Reporting environment is now available to health centers before January 1st. This early access is called the Preliminary Reporting Environment (PRE) and it allows health centers to become familiar with annual updates to UDS reporting requirements before the official reporting period begins on January 1st. | |
| 2. | Health centers can enter their UDS data during the PRE-period but cannot submit their UDS Report until January 1st. | |
| 3. | During the PRE period, a message will appear on the top of the UDS Report indicating that you are now using the PRE and that UDS Reports cannot be submitted until January 1st. |
|
| 4. | After the PRE has ended on January 1st, you can submit your report. A message on the top of the screen will indicate this. |
|
Clear Data Feature | |||
|---|---|---|---|
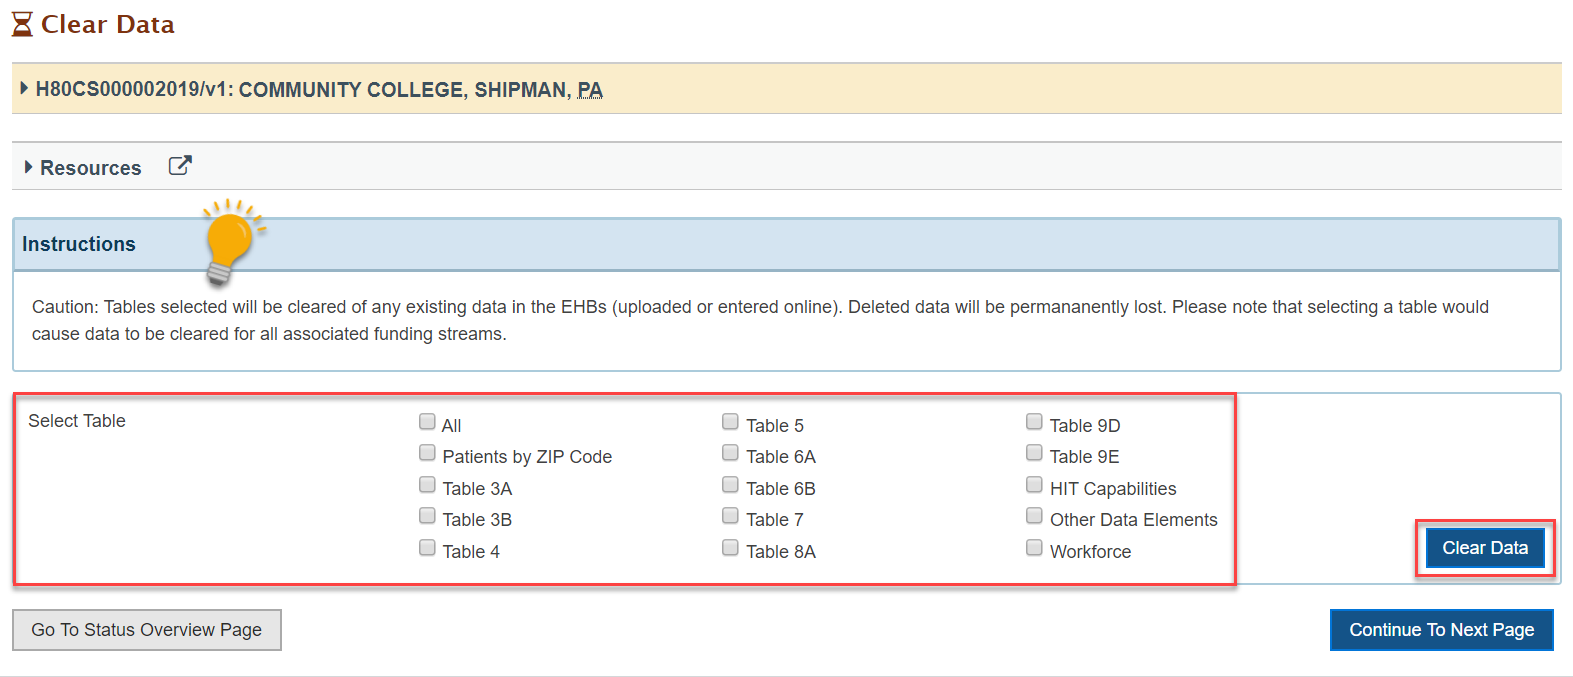
| 1. | The Clear Data Feature allows users to delete all data from selected tables or the entire report. To access the Clear Data feature, click the Clear Data link in the left-hand menu from the ‘Status Overview’ page. This will open the ‘Clear Data’ page. |
| |
| 2. | On the 'Clear Data' page select the table(s) from which you want to delete information. Once you have selected the table(s) you want to clear, click the Clear Data button.
|
| |
| 3. | Before permanently deleting the data, you will see a Confirmation message listing the table(s) you selected. If you are ready to delete the data from the table(s) listed, click the Confirm button. If you do not want to delete the data at that time, click Cancel and no changes will be made to the table(s). |
| |
Help Resources | |
|---|---|
| 1. | If you have any questions or need assistance with the UDS Report, contact the UDS Helpline by email at udshelp330@bphcdata.net or give them a call at 866-837-4357. |
| 2. | If you have EHBs issues or questions, contact Health Center Program Support at 877-464-4772. |

